List of Scans
- View all scans in a single consolidated list.
- Identify the scan type (agent or agentless).
- Track scan status, execution time, and results.
- Access detailed findings for each scan.
Prerequisite: Verify that your user role has the required ACF permission to view list of scans. To enable ACF permission, click here.
For each scan type, this inventory lists the following details:
- Scan Name
User-defined name for the scan, to identify individual scans
- Scan Host IP
IP address or IP range targeted during the scan
- Host FQDN
Fully qualified domain name (FQDN) of the scanned host, if available
Displays – when the FQDN is not resolved or not applicable
- Scan typeIndicates the scan that was performed
- Agent-based: Scan executed using an agent deployed on the host
- Agentless: Scan executed without an agent, through sources such network discovery scans and, vulnerability management scans (using integrations with tools such as Tenable)
- User
Username of the account that initiated/executed the scan
- Scan Date
Calendar date on which the scan was performed
- Start Time
Start time of the scan execution
- End Time
End time of the scan execution
- Assessed Crypto Category
-
Cryptographic categories assessed as part of the scan
- Scan Status
Outcome of the scan execution
You can also download/view the scan summary from this column. For instructions, see Downloading a Scan Summary Report.
Common inventory functions
| Feature | Description |
|---|---|
| Filters | To filter the inventory for viewing specific
data:
|
| Search | Enter free text or keywords to search for specific entries in the inventory. |
| Export | To export the inventory data:
|
| Pagination | Use the pagination control dropdown to select
the number of records that will be displayed per page of the
inventory. You can select to display 25, 50, 75, or 100 records per page of the inventory. |
| Pagination Navigation | Use the pagination navigation buttons to move between the pages in the inventory. |
| Refresh | Use the Refresh button to reload the inventory to display the up-to-date records. |
Downloading a Scan Summary Report
To authorize this feature for a user role, modify the Authorized Functions for that role to enable the Quantum Trust Hub > Publish Reports function.
For more details, see Managing Roles in the Platform User Guide.Method 1
-
Go to
 (Menu) >
Quantum Trust Hub >
Dashboard > List of
Scans.
(Menu) >
Quantum Trust Hub >
Dashboard > List of
Scans.
-
From the scans inventory, for the required scan, under the Scan
Status column, click
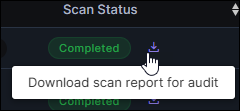 (Download scan report for audit).
- From the menu displayed, select the file format for the exported data.
- Save the exported file on your local file system, as required.
Method 2
-
Go to (Menu) >
Quantum Trust Hub >
Dashboard > List of
Scans.
-
From the scans inventory, for the required scan, under the Scan
Status column, click the scan status value
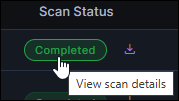 (View scan
details).
The corresponding Scan Status Summary is displayed.
(View scan
details).
The corresponding Scan Status Summary is displayed. -
From the Download reports dropdown list, select
the file format for the exported data.
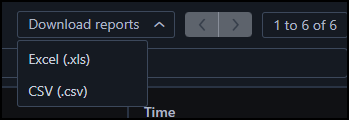
- Save the exported file on your local file system, as required.