Integrating Code Signing in Atlassian Bamboo Pipeline
Bamboo
- Automated building and testing of software source-code status
- Updates on successful and failed builds
- Reporting tools for statistical analysis.
Bamboo Pipeline
Here are the key components and concepts associated with Bamboo
pipelines:
- Stages: A pipeline is typically divided into stages, each representing a phase in the CI/CD process. Common stages include "Build," "Test," "Deploy to Staging," and "Deploy to Production." Stages are executed sequentially, and each stage may consist of one or more jobs.
- Jobs: Within each stage, you define one or more jobs. A job is a collection of tasks that need to be executed together. For example, a "Build" stage might have a single job that compiles source code, runs unit tests, and packages the application. Bamboo provides a wide range of built-in tasks and supports custom scripts and commands.
- Tasks: Tasks are individual steps within a job that perform specific actions, such as running a script, checking out code from a version control system, or publishing artifacts. Bamboo offers a variety of task types to accommodate different actions.
- Triggers: Pipelines can be triggered manually or automatically based on events. Automatic triggers can be set up to start a pipeline when code is pushed to a version control repository, ensuring that new changes are continuously integrated and tested.
- Branches: Bamboo pipelines can be configured to work with different branches of your version control repository. This allows you to have separate CI/CD pipelines for different development branches, such as feature branches or release branches.
- Artifacts: Bamboo allows you to manage and store build artifacts generated during the pipeline, making it easy to distribute them to different environments or store them for future reference.
- Notifications: Bamboo can send notifications and reports about pipeline results to team members via email, chat, or other communication channels.
- Parallel Execution: Bamboo supports parallel execution of tasks and jobs within a stage, enabling faster build and test times by taking advantage of available resources.
Bamboo Configuration File
Some of the key configuration files and
directories in Bamboo are:
- Bamboo Home Directory (BAMBOO_HOME): This directory contains many
of the configuration files and data for Bamboo. The specific location
and structure may vary based on your installation. Important
subdirectories and files include:
- xml-data/: Contains various XML configuration files
- lib/: May include libraries and JAR files for custom plugins and extensions
- agent/: Configuration files and data specific to Bamboo agents.
- Bamboo Agent Configuration: Each Bamboo agent has its own
configuration file named “bamboo-agent.cfg.xml”. This file contains
agent-specific settings, including the Bamboo server connection details.
Sample bamboo-agent.cfg.xml:
<?xml version="1.0" encoding="UTF-8"?>

<bamboo-agent>
    <!-- Bamboo server URL -->
    <serverUrl>http://bamboo-server:8085</serverUrl>

    <!-- Bamboo agent's unique identifier -->
    <agentUuid>YOUR_AGENT_UUID</agentUuid>

    <!-- Bamboo agent's display name -->
    <agentName>My Bamboo Agent</agentName>

    <!-- Bamboo agent's capabilities -->
    <capabilities>
        <!-- Example capability for Maven -->
        <capability name="system.builder.mvn3.Maven 3" value="/usr/local/apache-maven-3.8.1" />

        <!-- Example capability for Node.js -->
        <capability name="system.builder.node.Node.js" value="/usr/local/bin/node" />
    </capabilities>

    <!-- Bamboo agent's working directory -->
    <workingDir>/path/to/agent/work</workingDir>

    <!-- Bamboo agent's temp directory -->
    <tempDir>/path/to/agent/temp</tempDir>

    <!-- Bamboo agent's home directory -->
    <homeDir>/path/to/agent/home</homeDir>

    <!-- Bamboo agent's capabilities sharing method (usually "true" or "false") -->
    <sharingCapability>true</sharingCapability>

    <!-- Bamboo agent's environment variables -->
    <environmentVariables>
        <environmentVariable name="PATH" value="/usr/local/bin:/usr/bin:/bin" />
        <environmentVariable name="JAVA_HOME" value="/usr/local/jdk1.8.0_291" />
    </environmentVariables>

    <!-- Bamboo agent's security token (if required) -->
    <securityToken>YOUR_SECURITY_TOKEN</securityToken>
</bamboo-agent>
Configuring the Bamboo Pipeline Environment
-
Create or Open a Bamboo Plan:
- Login to the Bamboo instance and create a new plan or open an existing one where the code signing has to be integrated.
-
Add a Script Task:
- Within the Bamboo plan, add a new Script task to one of the existing jobs or create a new job for this purpose. This task will run the jarsigner command.
- Set the interpreter to "Windows PowerShell" if using a Windows agent or set the interpreter to "Shell" if using a Linux agent.
-
Configure the Script Task for Integration with AppViewX
CSP/PKCS#11:
In the Script Body section of the Script task configuration, add the required commands to sign the artifacts based on requirement.
-
Save and Execute:
- Save the Script task configuration.
- Trigger a Bamboo build for the plan or setup webhooks to trigger the task based on code commit or any other events based on configuration.
Prerequisites
- The pipeline should be configured with the required Build stages and the required artifacts should be ready for signing.
- Copied the downloaded SIGN_Package to the configured runner machine or agent and installed the package.
- Ensure the connectivity from the runner machine to the SIGN API Connector URL Node (Compute Cluster, Cloud Connector, LoadBalancer or OnPrem Worker Node).
Sample Script Configuration using AppViewX CSP and Signtool in Bamboo Dashboard
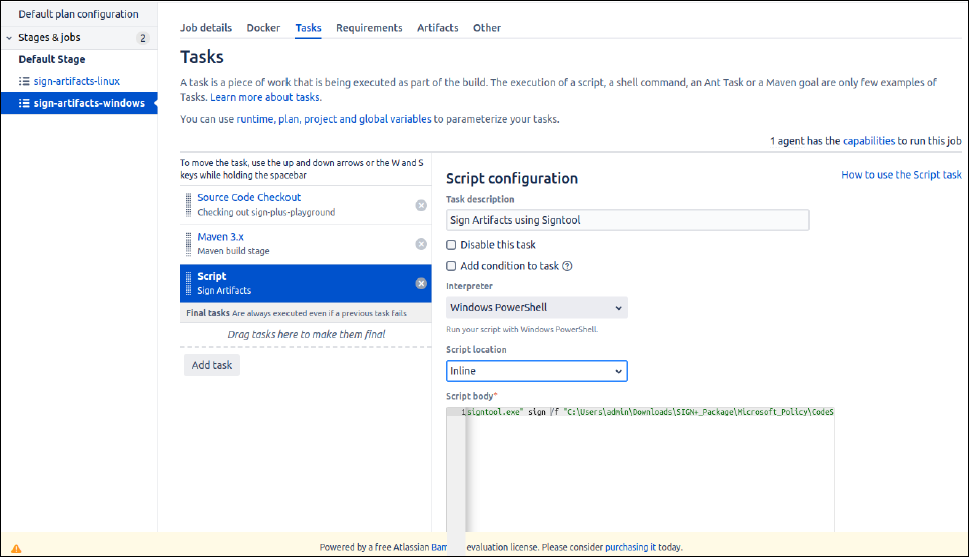
Using Signtool with AppViewX CSP
- Execute the AppViewX SIGN Installer executable in the configured runner machine to install the prerequisites required to use the AppViewX CSP/PKCS11 Providers.
-
Copy the
signtoolcommand generated in the README File after installation and update the Script Section with the generated command.signtool.exe sign /f <path to certificate> /fd <digest algorithm> /csp <csp_name> /k <key_alias_name> /tr <timestamp_url> /td <timestamp digest algorithm> <input_file_path>- /f <path to certificate>: Path to your code-signing certificate.
- /fd <digest algorithm>: Specifies the hashing algorithm.
- /csp <csp_name>: Name of Cryptographic Service Provider (CSP).
- /k <key_alias_name>: Key Container Name.
- /tr <timestamp_url>: Provides a timestamp from a trusted timestamping authority.
- /tr <timestamp_digest>: Specifies the timestamping Digest algorithm.
- <input_file_path>: Path to the file to be signed.
Using JarSigner with AppViewX CSP
- Execute the AppViewX SIGN Installer executable in the configured runner machine to install the prerequisites required to use the AppViewX CSP/PKCS11 Providers.
-
Copy the
Jarsignercommand generated in the README File and update the Script Section with the generated command.
The <time_stamp_url>, <signature algorithm> and <keypair alias> parameters are auto generated in the README after running the SIGN Installer.jarsigner.exe -verbose -storetype "Windows-My" -keyStore NONE -tsa <time_stamp_url> <input_file_path> -signedjar <output_file_path> -sigalg <signature algorithm> <keypair alias>
Using Nuget with AppViewX CSP
- Execute the AppViewX SIGN Installer executable in the configured runner machine to install the prerequisites required to use the AppViewX CSP/PKCS11 Providers.
-
Copy the
nugetcommand generated in the README File and update the Script Section with the generated command.
The <time_stamp_url>, <certificate_fingerprint> and <hashing_algorithm> parameters are auto generated in the README after running the SIGN Installer.nuget.exe sign <input_file_path> -Timestamper <timestamp_url> -CertificateFingerprint <certificate_fingerprint> -HashAlgorithm <hashing_algorithm> -Verbosity detailed -Overwrite
Using JarSigner with AppViewX PKCS#11 Provider
- Execute the AppViewX SIGN Installer executable in the configured runner machine to install the prerequisites required to use the AppViewX CSP/PKCS11 Providers.
-
Copy the
Jarsignercommand generated in the README File and update the Script Section with the generated command.
The <path to AVXPKCS11V1.cfg>, <time_stamp_url>, <signature algorithm> and <keypair alias> parameters are auto generated in the README after running the SIGN Installer.jarsigner -verbose -keystore NONE -storetype PKCS11 -certs -providerclass sun.security.pkcs11.SunPKCS11 -providerArg <path to AVXPKCS11V1.cfg> <input_file_path> -signedjar <output_file_path> -tsa <time_stamp_url> -sigalg <signature algorithm> <keypairalias>
Using JSign with AppViewX PKCS#11 Provider
- Execute the AppViewX SIGN Installer executable in the configured runner machine to install the prerequisites required to use the AppViewX CSP/PKCS11 Providers.
-
Copy the
JSigncommand generated in the README File and update the Script Section with the generated command.
The <path to AVXPKCS11V1.cfg>, <keypair alias>, <digest algorithm>, <timestamp url> parameters are auto generated based on the signing policy configurations in the README after running the SIGN Installer.java -jar <path_to_jsign_jar> --keystore <path to AVXPKCS11V1.cfg> --storetype PKCS11 --storepass 12345678 --alias <keypair alias> --alg <digest algorithm> --tsaurl <timestamp url> <input_file_path>
Using APKSigner with AppViewX PKCS#11 Provider
- Execute the AppViewX SIGN Installer executable in the configured runner machine to install the prerequisites required to use the AppViewX CSP/PKCS11 Providers.
-
Copy the
APKSignercommand generated in the README File and update the Script Section with the generated command.
The <path to AVXPKCS11V1.cfg>, <keypair alias> parameters are auto generated based on the signing policy configurations in the README after running the SIGN Installer.java -jar <path_to_apk_signer_jar> sign --provider-class sun.security.pkcs11.SunPKCS11 --provider-arg <path to AVXPKCS11V1.cfg> --ks NONE --ks-type PKCS11 --ks-pass pass:12345678 --ks-key-alias <keypair alias> --in "<input_file_path>" --out "<output_file_path>" --v1-signing-enabled false --v2-signing-enabled false --v3-signing-enabled true --v4-signing-enabled falseNote: The script can be configured to sign with any tool using the commands generated in the README File based on requirement.