Validation Authority
Certificate authorities use Online Certificate Status Protocol (OCSP) to get the revocation status of x.509 digital certificates. When a user requests the validity of a certificate, an OCSP request is sent to an OCSP server for verification against a trusted certificate authority. The OCSP server then returns a response indicating whether the certificate is good, revoked, or unknown.
- OCSP URL must be published in the AIA field of the certificate with the AppViewX OCSP server URL.
- OCSP Server and OCSP Generator must be deployed for OCSP to work.
- For on-premise deployment, configure OCSP as explained here.
- You can select one or more certificates from the inventory and click Actions > Revocation Check to perform revocation validation. After successful validation, the certificate status is reflected through color-coding in the Common Name column.
CRL Profiles
- Standard CA: Lists CRLs only from AppViewX CA (GCP-backed CA) with details such as CRLDP, issuer common name, linked OCSP, next update time, DC name, and connectivity.
- PQC Ready CA: Lists CRLs from AppViewX Native CA. This option is available only if at least one AppViewX Native CA has been created. Only then the system automatically creates a new OCSP responder for the AppViewX Native CA.
CRL Scheduler
To set the CRL scheduler for Root CA:
-
Go to
 .
.
- Select the CRL tab. By default, this is selected.
-
Select PQC Ready CA. By default, this is
selected.
Note: The CRL Scheduler and Actions are available only for PQC Ready CA. Ensure that you have necessary role-based access controls and workflow access to publish CRL.
-
Enter the following details for Root CA.
Table 1. Fields for CRL Scheduler Field Description *Timezone Select a timezone from the dropdown list. The scheduler runs on the selected timezone. Starts on Select a start date and time by clicking the calendar. *Frequency Select the frequency as daily, weekly, or monthly. *Days of Week This field appears only for root CA. Select the days of the week you want the scheduler to run. *Overlap Period Select the overlap period in days or weeks. CRL validity overlap between two consecutive CRLs. *: Mandatory fields -
Enter the following details for Sub CA:
Table 2. Fields for CRL Scheduler Field Description *Timezone Select a timezone from the dropdown list. The scheduler runs on the selected timezone. Starts on Select a start date and time by clicking the calendar. *Frequency Select the frequency as daily, weekly, or monthly. *Overlap Period Select the overlap period in days or weeks. CRL validity overlap between two consecutive CRLs. *: Mandatory fields The created CA is displayed on the CRL home page as shown:
- Click Publish Now in Actions to trigger CRL issuance for the selected Native CA.
OCSP Profiles
You can create the following OCSP profile by going to PKI+ > Validation Authority > OCSP:
- If you want to activate a selected OCSP signing certificate, you can do it
from Actions > OCSP Signing. The OCSP configuration is updated with
the selected certificate.Note: An OCSP signing certificate can be revoked only on deleting the CA. If an OCSP signing certificate is revoked or deleted from the CERT+ > Certificate Inventory > Server page, then the OCSP responder will not work. To remediate this action, you can create a new OCSP signing certificate by going to CERT+ > Certificate Action > Enroll Certificate and following the procedure explained in the Section, Creating OCSP Signing Certificate.
Configuring OCSP for On-Premise Deployment
-
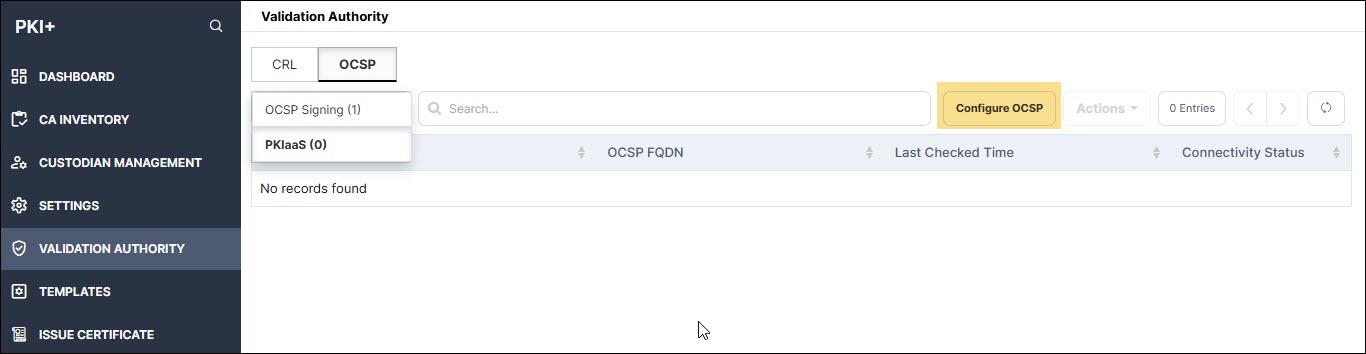
Go to (Menu) icon > PKI+ > Validation
Authority. By default, CRL is selected.
-
Click the OCSP tab and click PKIaaS from the dropdown
list as shown.
-
Click Configure OCSP.
The Configure OCSP - PKIaaS window is displayed.
-
Enter the following fields:
Table 3. Field Description for Configure OCSP - PKIaaS page Field Description *OCSP Name Provide a friendly name. *OCSP FQDN Enter the node domain name where OCSP plugin is hosted. Note: Fields marked with red asterisk (*) are mandatory. -
Click Add.
The entered information is displayed in the table.To troubleshoot OCSP responder with openSSL, see Section, Troubleshooting.
Creating OCSP Signing Certificate
To create an OCSP signing certificate:
-
Go to CERT+ > Certificate Action > Enroll Certificate.
The Enroll Certificate page is displayed.
- Select the Certificate Authority as AppViewX PKIaaS.
- Select the Certificate Profile as OcspSigning.
-
Fill out the other fields as explained in the Section, Adding/Enrolling Certificate.
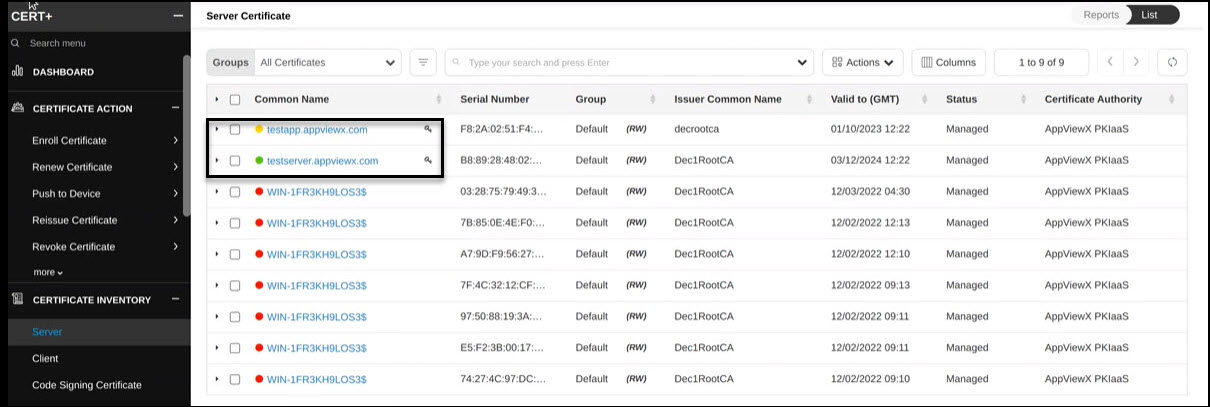
The OCSP signing certificate appears on the CERT+ > Certificate Inventory > Server page as shown with a key symbol beside the common name.