AppViewX InfinityAI Reports (Tech Preview) 
AppViewX has introduced AI Reports, offering a natural language processing (NLP) interface for generating certificate management reports. This feature enables users to query certificate data using natural language, making complex reporting accessible to non-technical users while maintaining the power and flexibility of advanced certificate analytics. It provides an intuitive interface where users can:
- Enter natural language queries about their certificate infrastructure
- Access pre-defined sample queries for common use cases
- Generate instant reports based on their queries
- Natural Language Input: Users can type questions in plain English
- Sample Query Templates: Pre-defined queries for common scenarios
- Instant Report Generation: Real-time report creation based on queries
- Responsive Design: Adapts to different screen sizes
- Error Handling: Graceful handling of invalid inputs and system errors
Prerequisites
Adding the AVX LLM Plugins
If they're using interactive-iu, they have to answer "yes" to additional questions/configuration. At the end of additional questions, there will be a question for enabling any optional plugins, for that question, they can fill "avx_llm_engine" (As soon as they type avx, a dropdown of all the optional plugins will appear, they can just select avx_llm_engine there)If they aren't using interactive-iu, then simply add "avx_llm_engine" in the ENABLED_PLUGINS parameter of appviewx.conf. And then they can trigger install, upgrade or plugins_install.sh.
Installing avx_llm_engine using Interactive UI
Refer to the Interactive-Based Installation with Terminal UI for the detailed steps.
Installing avx_llm_engine using Configuration file
plugins_install.sh commands to install
the plugin.Enabling the Large Language Model (LLM) Configuration
-
Go to
 ( Menu) >
Platform > Identity >
Role.
The Role page is displayed. The predefined roles are listed here.
( Menu) >
Platform > Identity >
Role.
The Role page is displayed. The predefined roles are listed here. -
Click
 Add.
Note: You may also edit any of the exiting roles to enable the permissions.The Role > Add page is displayed with the Information tab enabled.
Add.
Note: You may also edit any of the exiting roles to enable the permissions.The Role > Add page is displayed with the Information tab enabled. -
From the Information tab, Enter the Name (mandatory) and
Description and click Save.
The Role name is created successfully and the Authorized functions tab is enabled.
- Click the Authorized functions tab.
-
Expand Platform > Identity > Asset Management and
select the LLM Configuration.
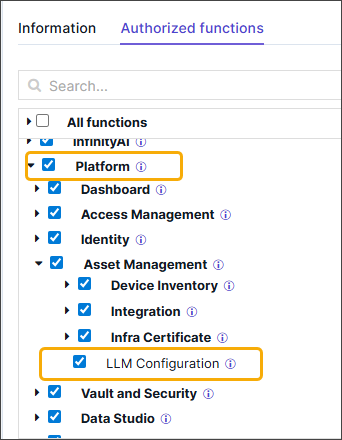
- Click Save.
-
Go to Menu > Platform > Asset Management
LLM Configuration is displayed as one of the menu options.
Enabling the AI Reports feature
-
Go to ( Menu) >
Platform > Identity >
Role.
The Role page is displayed. The predefined roles are listed here.
-
Click Add.
Note: You may also edit any of the exiting roles to enable the permissions.The Role > Add page is displayed with the Information tab enabled.
-
From the Information tab, Enter the Name (mandatory) and
Description and click Save.
The Role name is created successfully and the Authorized functions tab is enabled.
- Click the Authorized functions tab.
-
Expand InfinityAI > Reports and select the following
options:
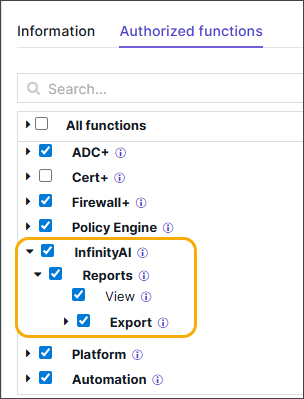
- View - Access to query any data source using natural language and generate AI-based reports
- Export - Access to export AI-generated reports.
- Click Save.
-
Go to Menu > Platform > Data Studio >
Reports.
AI Reports is displayed as one of the tabs on the Reports page
Setting up the LLM Configuration
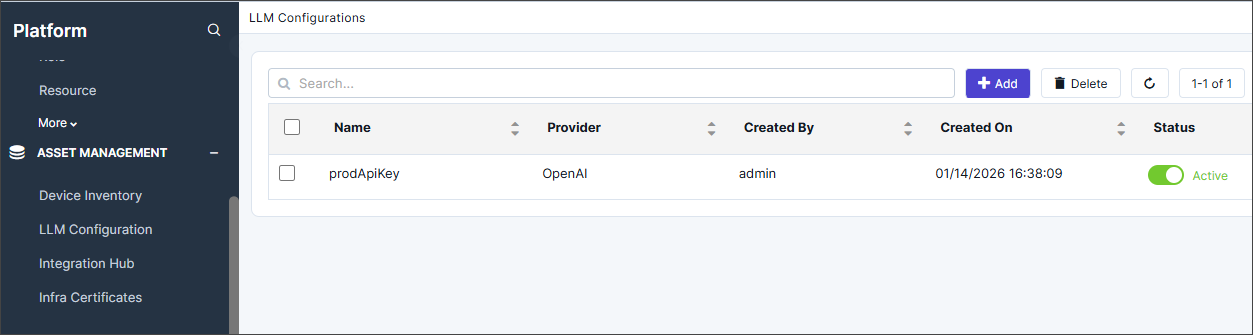
-
Go to Menu > Platform > Asset Management > LLM
Configuration
The LLM Configuration is displayed.
-
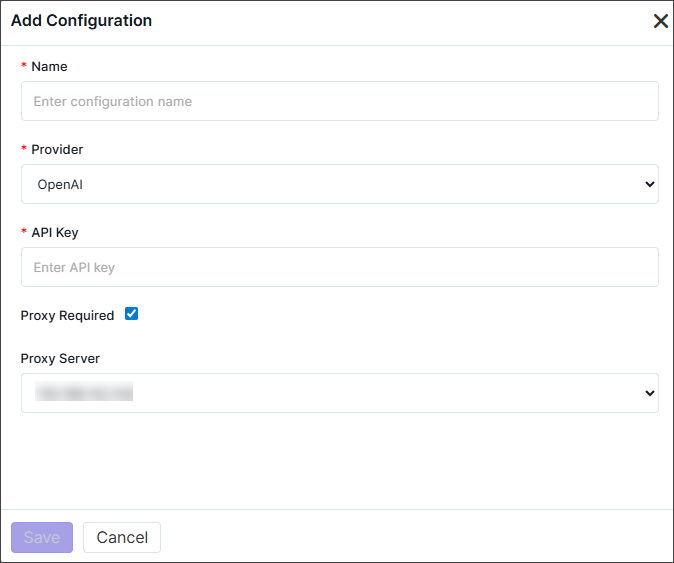
Click +Add.
The Add Configuration pop-up is displayed on the right.
-
Enter the fields as described in the table below.
Table 1. Field descriptions for the LLM Add Configurations page Fields Description *Name Enter a suitable name for the configuration. *Provider Select the provider. Note: Currently only OpenAI is the available LLM provider.*API Key Enter the customer-managed Open API Key. Proxy Required Select the checkbox to use any of the configured proxies. Proxy Server This field is enabled only when the Proxy Required checkbox is selected. Select the required proxies.
*: Mandatory fields -
Click Save.
The configuration is added in the inventory with Status as Active.
Replace Active Configuration - this button makes the existing configuration Inactive and replace the current active configuration with the newly configured value as Active.
Save as Inactive Configuration - this button saves the newly configured value as Inactive.