
Configuring AppViewX Settings - Domain Separation Enabled
-
On the ServiceNow instance, in the Filter navigator, search for the app
by typing the keyword.
The AppViewX plugin page is displayed with the AppViewX Catalog page open by default.
-
From the navigation pane on the left, under Administration, click
AppViewX Settings.
The AppViewX Settings page appears, displaying the list of configured settings.
- On the AppViewX Settings page, click New.
-
On the Connection Settings page,enter the required field
information.
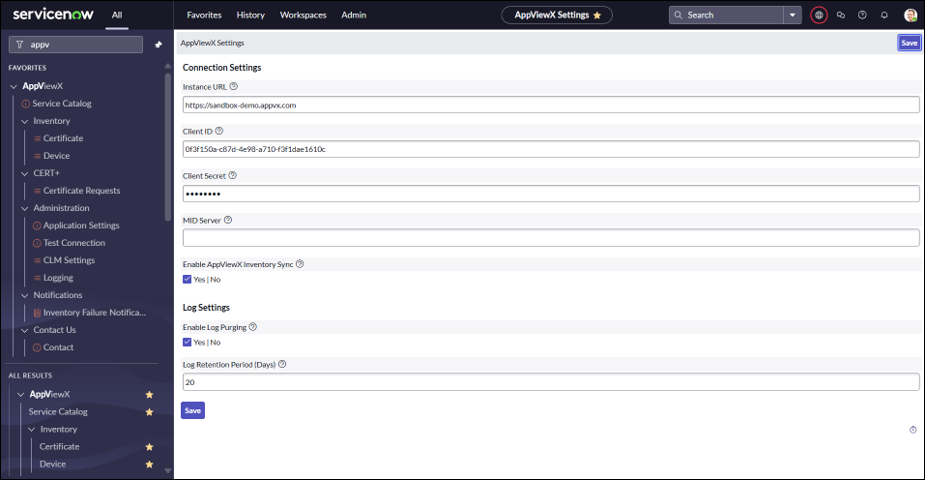 The following table describes the fields in this section:
Table 1. Connection Settings - Field and Description Table Field Description *Instance URL Enter the AppViewX instance URL where the plugin is configured. Note:- For both on-premise and SaaS deployments, ensure that the URL does not include / at the end.
- For on-premise deployments, ensure that the port number is included in the URL.
*Client ID Enter the Client ID generated during the creation of the Service Account. For more information, click here.
*Client Secret Enter the Client Secret generated during the creation of the Service Account. For more information, click here.
*MID Server Enter the MID Server name. The MID Server allows you to reach AppViewX from ServiceNow even when AppViewX is not exposed to the internet. Note: This is required only for on-prem deployments.Enable AppViewX Inventory Sync Select the Yes | No checkbox to enable the AppViewX inventory sync. For more information on how to schedule the sync, click here.
Enable Log Purging Select thSelect theYes | No checkbox to enable the Log Purging. Log Retention Period (Days) Enter the number of days to hold logs for the given time period. *: Mandatory fields
- Click Submit.
