Migrating from AVX Standard CA to AVX Native CA
You can initiate migration from the CA Inventory page by cloning an existing CA or creating a new one. The workflow includes configuration, custodian approval, and execution tracking, along with real-time status updates and the ability to resume if interrupted. This process enhances security, auditability, and operational visibility, ensuring a seamless transition with minimal disruption.
Ensure the following before starting the migration:| Prerequisite | Requirement |
|---|---|
| User role | Privileged user access is required. Only privileged users can initiate CA migration. |
| CA Account Name | A unique CA Account Name. Duplicate names and empty values are not accepted. |
| Network access | The system must be able to reach the PKI CA endpoint to verify connectivity during initialization. |
| Standard CA in inventory | At least one Standard (GCP-backed) CA must exist in the CA Inventory. |
| Custodians | Custodians must be available to approve the migration request (unless approval is not required by policy). |
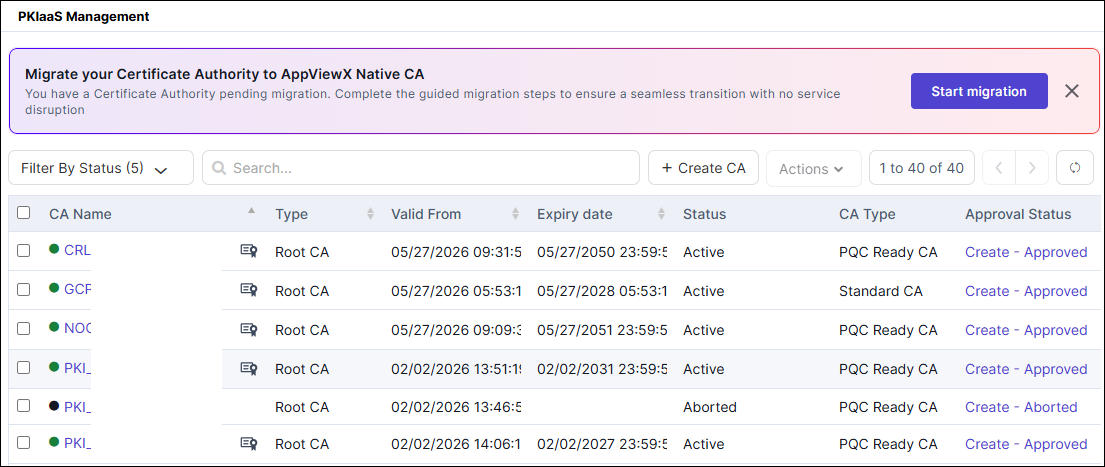
Migration Initiation Banner
The following table describes the available banner actions:
| Action | Description |
|---|---|
| Start migration | Launches the migration wizard from the beginning. |
| Resume migration | Reopens the migration wizard at the step where the previous session ended. |
| View Approval Status | Opens the custodian approval tracking view for the pending CA creation request. |
| Remind Me Later | Postpones the banner. Select 1 Day, 1 Week, 1 Month, or Never from the dropdown. |
| Dismiss (x) | Closes the banner for the current session. The banner reappears on the next login. |
Clicking Remind Me Later displays a dropdown with the following options:
| Option | Behavior |
|---|---|
| 1 Day | The banner is hidden and reappears after 24 hours. |
| 1 Week | The banner is hidden and reappears after 7 days. |
| 1 Month | The banner is hidden and reappears after 30 days. |
| Never | The banner is permanently hidden for this user until an administrator resets the preference. |
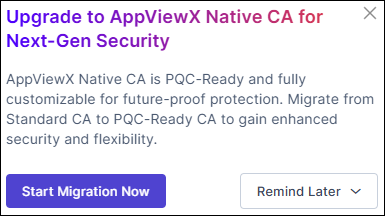
Upgrade popup
-
Go to .
The Migration Initiation Banner is displayed at the top of the page.
- Review the banner message to understand your current migration state.
-
Click Start migration (if not yet started) or
Resume migration (if already in progress).
The migration wizard opens at the correct step for your current state.
-
Follow the on-screen steps in the wizard to complete the migration.
Refer to the sub-tasks below for detailed instructions for each wizard step.
Migration wizard steps
| Step | Name | Description |
|---|---|---|
| 1 | Initialize AppViewX Native CA | Set up the CA account. |
| 2 | Source Selection | Select the GCP CA to migrate from. |
| 3 | Migration Setup | Choose the migration method. |
| 4 | CA Creation | Configure the AppViewX CA settings. |
| 5 | Complete Migration | Review and confirm the migration status. |
| 6 | Migration Summary | Review the final migration status. |
Initialize AppViewX Native CA
AppViewX Native CA is a PQC-ready private PKI service that issues digital certificates using both traditional and post-quantum cryptographic algorithms. Initializing the CA sets up the account that the migration wizard uses throughout the process.
- Navigate to .
-
Click Start Migration.
The system automatically checks whether the PKI CA is already initialized. If not initialized, the Initialize AppViewX Native CA page is displayed.
-
In the CA Account Name field, enter a unique name for the CA account.
The name accepts alphanumeric characters and hyphens. Duplicate names and empty values are not accepted.
-
Click Activate.
The system attempts to initialize the CA and verifies the connection. The Connection Status is displayed below the CA Account Name field.
-
Review the Connection Status before proceeding.
A successful status indicates the CA account is initialized and the wizard can proceed to the next step. If the status shows an error, verify network access to the PKI CA endpoint and retry.
Migration Overview
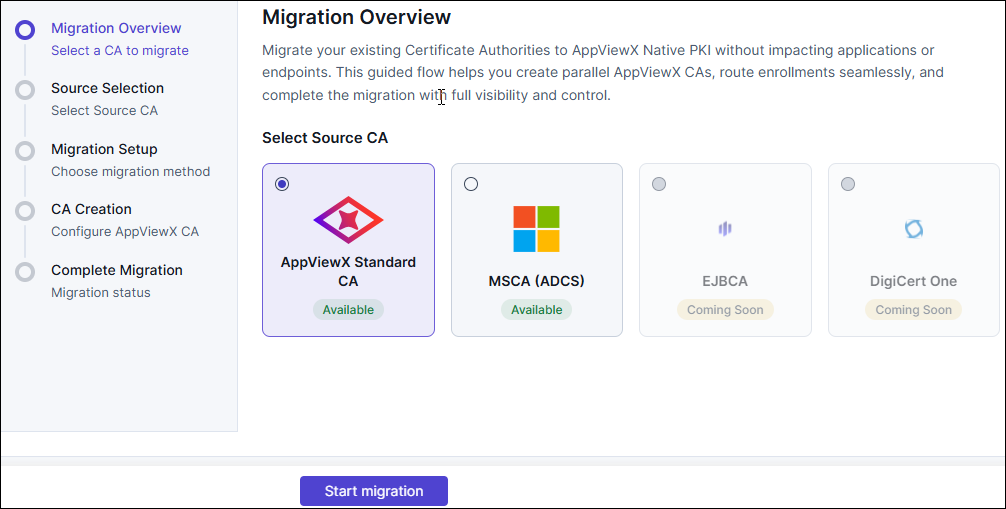
- Select Legacy CA as the select source CA type.
-
Click Start Migration.
The Source Selection page is displayed.
Select source CA
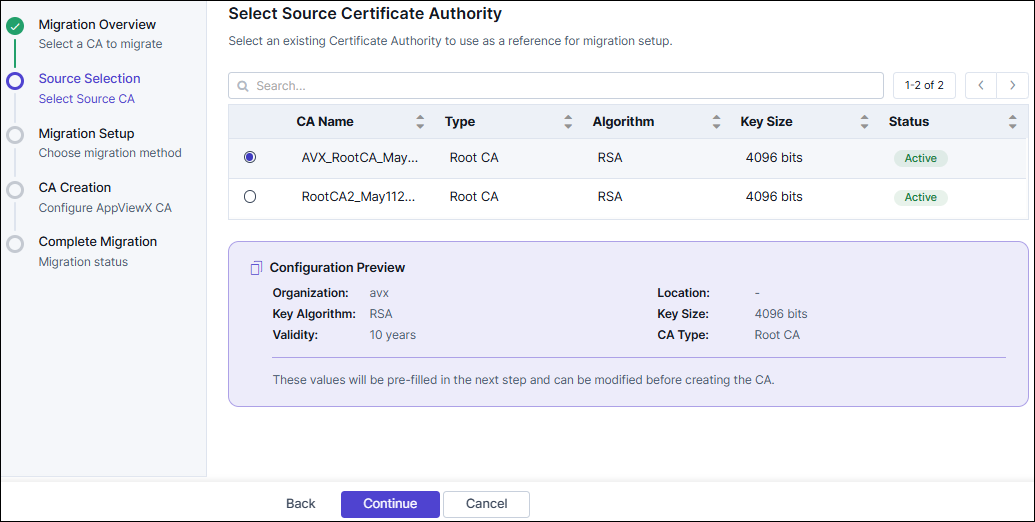
- On Select Source Certificate Authority page.
-
Review the list of available CAs in the table.
The table displays the following columns:
- CA Name: Certificate Authority name
- Type: Root CA or Subordinate CA
- Algorithm: Cryptographic algorithm (for example, RSA or EC)
- Key Size: Key size in bits
- Status: Current state (for example, Active or Awaiting user activation)
- Optional: Use the Search field to filter CAs by name.
-
Select the radio button next to the CA that you want to migrate.
A Configuration Preview panel appears at the bottom of the page showing the selected CA's settings.
- Review the Configuration Preview to confirm your selection.
- Click Continue to proceed to Migration Setup, or click Back to return to the previous step.
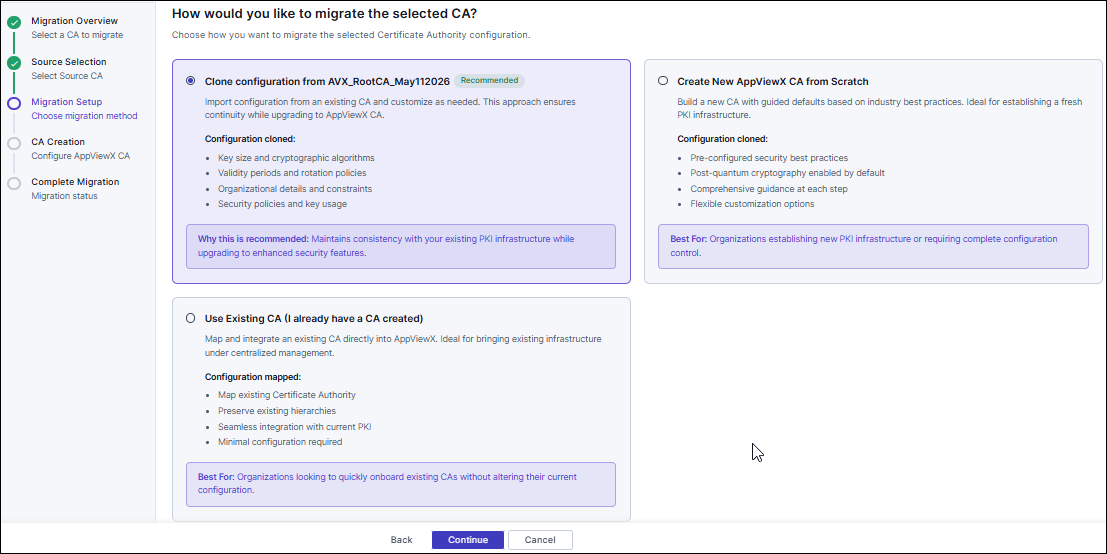
Configure migration setup
- Clone configuration from existing CA (Recommended): Copies configuration from the selected CA, including key size, cryptographic algorithm, and other settings.
- Create New AppViewX CA from Scratch: Creates a new CA using guided defaults and best practices.
- Use Existing CA (I already have a CA created): Maps an existing AppViewX Native CA to AppViewX for centralized management.
Clone existing CA for migration
- You must have authorization to initiate CA migration.
- At least one Standard (GCP-backed) CA must exist in the CA Inventory.
- No other CA migration should be in Pending Approval status.
-
On the Migration Setup page, select Clone Existing CA.
The CA selection list is displayed.
-
Select the Standard CA you want to clone from the list and click Proceed.
The Configure Your AppViewX CA page opens with all fields pre-populated from the selected CA.
-
Review the pre-populated configuration and modify the editable fields as needed.
Important: You cannot modify the Tier and Certificate Authority Type fields when using the Clone CA option.
- Enter the required CA configuration details.
-
In the Approval and Custodians section, review the custodians who will receive the approval request.
Important: The AppViewX CA is created after at least 51% of the listed custodians approve the request.
- Optional: To add custodians, click Add New Custodian, add the required users, and then click Refresh to update the list.
-
Click Initiate Migration to submit the CA creation request.
If custodian approval is required, the migration status changes to Pending Approval and the CA Inventory banner updates to show current progress. If custodian approval is not required, the migration status changes to CA Created Successfully! and the wizard advances to the Complete Migration step.
Create AppViewX Native CA from scratch
- You must have the necessary permissions to initiate CA migration and create a new CA.
- Ensure you have access to the list of custodians for approval.
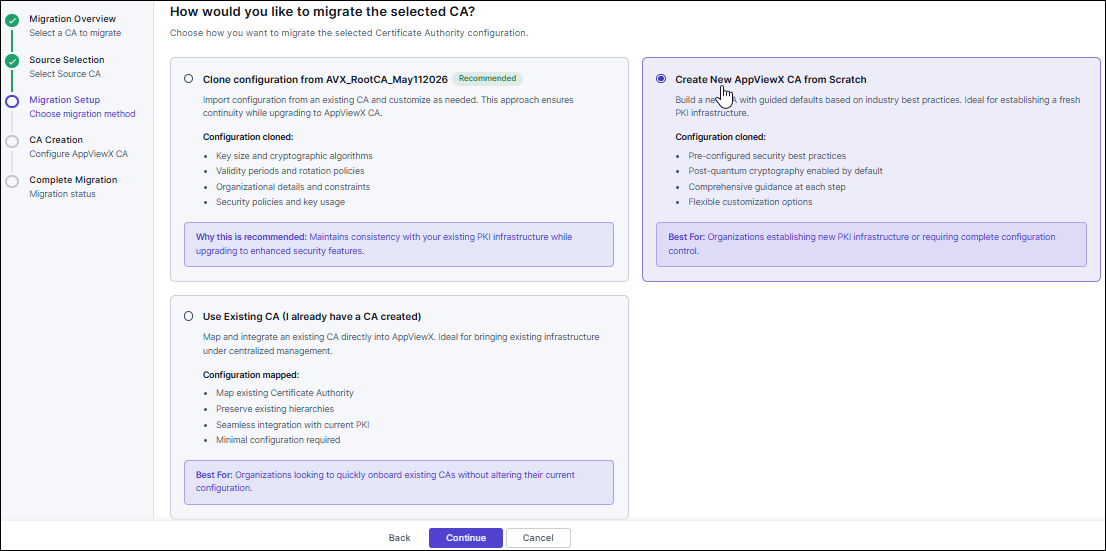
-
On the Migration Setup page, select Create CA from Scratch.
The Configure Your AppViewX CA page opens with all fields empty.
- Enter the required CA configuration details.
-
In the Approval and Custodians section, review the custodians who will receive the approval request.
Important: The AppViewX CA is created after at least 51% of the listed custodians approve the request.
- Optional: To add custodians, click Add New Custodian, add the required users, and then click Refresh to update the list.
-
Click Initiate Migration to submit the CA creation request.
A CA Configuration Summary popup is displayed.
-
In the Summary popup, verify all configured CA details and click Proceed to submit the request.
If custodian approval is not required, the migration status changes to CA Created Successfully! and the wizard advances to the Complete Migration step.
Map an existing CA during migration
- You must have the appropriate RBAC permissions to view and select CAs.
- At least one AppViewX Native CA of the required type (Root CA or Subordinate CA) must exist in the CA Inventory.
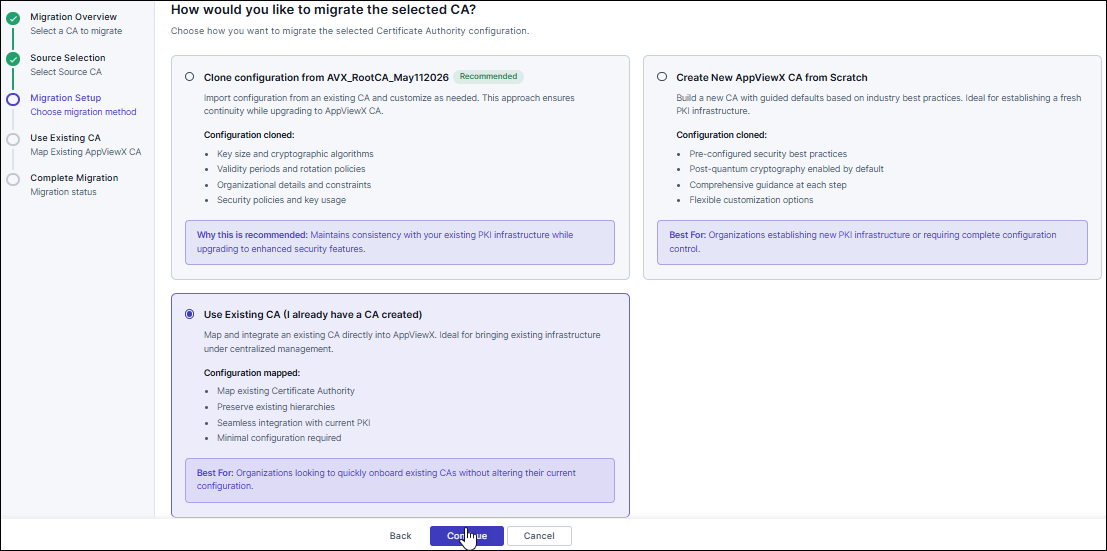
-
On the Migration Setup page, select Use Existing CA.
A filtered list of existing AppViewX Native CAs compatible with the source CA type is displayed.
-
From the Target CA dropdown, select the CA you want to map to the source CA.
The selected CA is highlighted and its metadata (Name, Type, Status) is displayed.
-
Click Confirm to apply the mapping.
The selected CA is mapped to the source CA and the wizard advances to the next migration step.
- Click Continue to proceed.
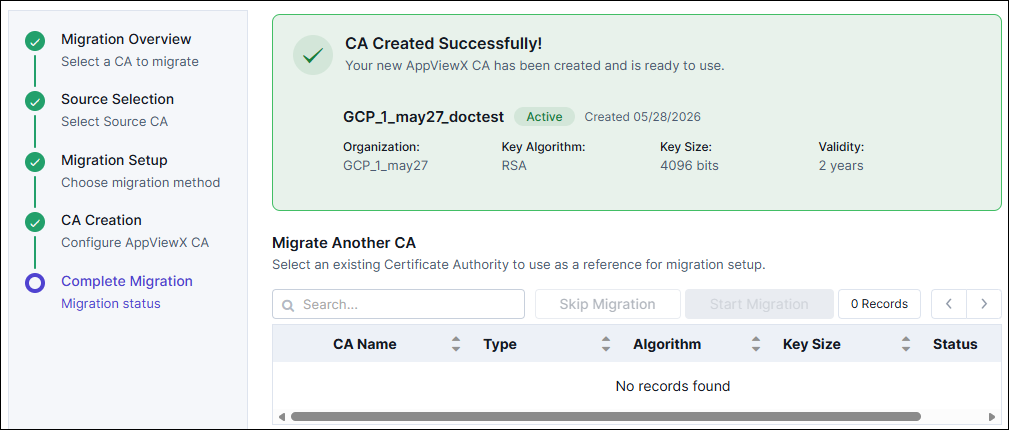
Complete migration and track approval
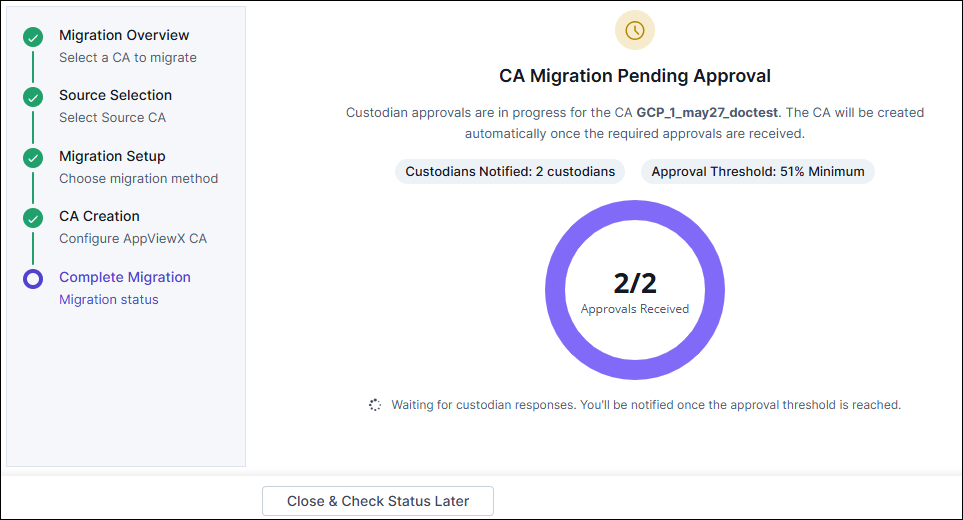
The Complete Migration page shows the following approval status details:
- Custodians Notified: The number of custodians who received the approval request.
- Approval Threshold: The minimum percentage of approvals required (default: 51% minimum).
- Approvals Received: A real-time counter (for example, 0/2) showing how many custodians have approved.
- Status message: Indicates that the system is waiting for custodian responses.
When a migration is pending approval, a yellow banner at the top of the CA Inventory page displays the pending status. Click View Approval Status in the banner to open the approval tracking view.
Each CA entry in the inventory includes the following approval actions:
| Action | Description |
|---|---|
| Resubmit | Resubmit the CA creation or deletion request if it was previously rejected. |
| View | Open the CA details and configuration page. |
| Activate | For subordinate CAs in Pending Signed Certificate status, upload the signed certificate to activate the CA. |
-
Click Proceed in the Summary popup to submit the migration request.
The Complete Migration page is displayed with the current approval status.
- On the Complete Migration page, review the approval status.
-
If approvals are pending, click Close and Check Status Later to exit the wizard.
To check the status later, go to the CA Inventory page and view the migration status banner.
-
After the migration is completed, the migration status is displayed as CA Created
Successfully.
Post-Migration: Retiring Legacy Standard CAs

When all migration actions are complete, the following banner appears at the top of the CA Inventory page:
You can now retire legacy Standard Certificate Authorities that are no longer needed, initiating their permanent deletion from the backend. Select a CA marked as "Standard CA" from the inventory and choose Actions > Delete to proceed. You may also choose Disable first to stop issuance and assess impact before completing the irreversible deletion.Retire a legacy Standard CA
- Go to Menu > PKI > CA Inventory.
- In the CA list, locate the CA with the type Standard CA.
- Optional: Click Actions > Disable to stop certificate issuance from the CA and assess the impact before deletion. This step is recommended before performing an irreversible deletion.
- Click Actions > Delete next to the Standard CA you want to retire.
-
In the confirmation dialog, review the details and click Confirm to
permanently delete the CA from the backend.
The deletion is permanent and irreversible. Once a Standard CA is deleted, it cannot be recovered. Ensure that no active certificate workflows depend on the CA before proceeding.