RabbitMQ
Onboarding RabbitMQ
-
Go to
 (Menu) > CLM >
ADMINISTRATION > Device
Management.
By default, the ADC tab opens.
(Menu) > CLM >
ADMINISTRATION > Device
Management.
By default, the ADC tab opens. - Click the Server tab.
-
Click the
 (Add) icon.
-
Select RabbitMQ logo from the Vendors list.
The RabbitMQ server configuration screen is displayed.
-
In the Server Details section, enter details as
mentioned below.
Table 1. Server Details - Field Description Table Fields Description *Server name Enter the server name. *IP address/ FQDN Enter the IP address, Short name or the fully qualified domain name (FQDN) of the server that is to be onboarded. Example:- IP Address: 127.0.0.1
- Short name: server01
- FQDN: server01.example.com
Note: The Short name must be resolvable to its corresponding FQDN.Data center Select the desired data center from the dropdown list. Onboarding Group Select the onboarding group to assign the device. Note: Devices without an assigned group are automatically mapped to the Default group during migration, onboarding, and when edited without existing group mappings.Communication mode Select the required communication mode. The possible options are:
- SSH
- SSM
*SSH Port Enter the SSH port number Note: This field is displayed only if the Communication mode selected is SSH.Cert sync Choose from any of the following: - Managed - AppViewX performs the config fetch operations and the certificates are discovered and managed in the inventory. CLM actions (push & bind, rollback etc.) can be performed on them. This option is disabled by default.
- Monitored - AppViewX performs the config fetch operations and the certificates are downloaded in the inventory in the read-only state. CLM actions cannot be performed on them.
- Ignored - AppViewX only performs the config fetch operations for the devices. There is no certificate discovery performed.
*: Mandatory fields -
In the Credentials section, select/enter the details
as follows.
If Communication mode = SSH the fields are as follows:
Table 2. Credentials - Field Description Table Fields Description *Credential Type Select the credential type from the dropdown. - Manual entry (default)
- Credential List - xyz (All the configured external vaults.)
- SSH
*Username This filed is displayed only if the Credential Type = Manual. Enter the designated username for authentication.
*Password This filed is displayed only if the Credential Type = Manual. Enter the secure password.
*Credentials list When Credential list - xyz is selected as the credential type, the Credentials List dropdown appears. Select the desired preconfigured credential list from the available options. *Upload key This filed is displayed only if the Credential Type = SSH. Click Browse to select the SSH key.
Passphrase This filed is displayed only if the Credential Type = SSH. Enter the SSH password.
*: Mandatory fields If Communication mode = SSM the fields are as follows:Table 3. Credentials - Field Description Table Fields Description *Credential Type Select the credential type from the dropdown. - Manual entry (default)
- Credential List - cloudAccount
*Access key This filed is displayed only if the Credential Type = Manual. Enter the access key to login to the EC2 instance of the AWS cloud machine.
*Secret key This filed is displayed only if the Credential Type = Manual. Enter the secret key to login to the EC2 instance of the AWS cloud machine.
*Account name If Credential list - cloudAccount is selected, the Account name dropdown field is displayed. Select any of the preconfigured cloud account values. *: Mandatory fields -
In the Vendor Specific Details section enter the
details as follows.
Table 4. Vendor Specific Details - Field Description Table Fields Description Config path Enter the path where the config file is saved. Example:etc/rabbitmq/rabbitmq.config
*: Mandatory fields -
Click Save.
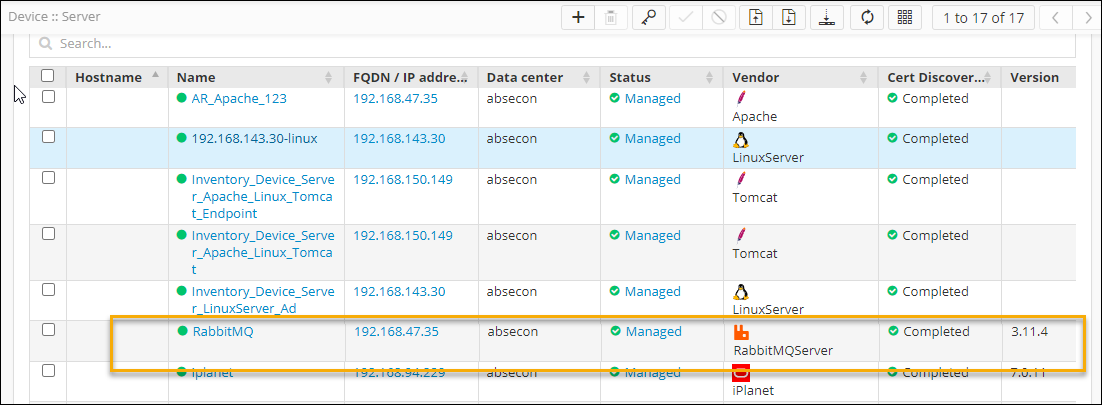
The device is on-boarded successfully and the version number in the Version column will contain the value 3.11.4.
Validating the Device
-
Go to ADMINISTRATION > Device
Management.
By default, the ADC tab opens.
-
Click the Server tab.
The Server Inventory page is displayed.
-
Check that the device name appears in the inventory (Name column) with the
specified status in the status column.
The status column will have the value Managed/Monitored/Ignored if the connection is successful or displays Failed/Unresolved in case of failure.
-
From the Status column, click the
Managed/Monitored/Ignored/Failed/Unresolved.
Device Status Log pop-up is displayed.
- Expand each value in the pop-up to know the Device communication, Device Version, Instance Information, and Certificate Discovery From Device.
What's Next
- If you want to discover certificates from the onboarded device, see Managed Devices Scan.
- If you want to enroll a new server certificate, see Enrolling a Server Certificate.