Installing the AppViewX OVA
This section covers the procedures for installing the AppViewX master and worker OVA.
-
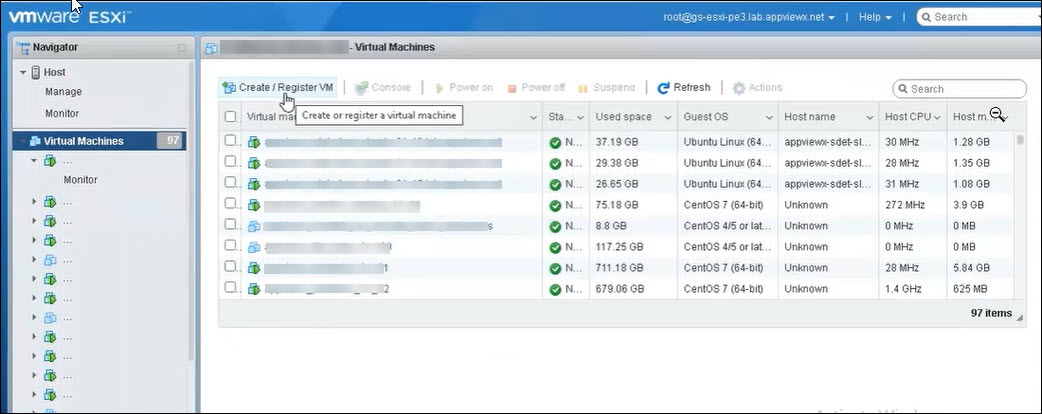
Log into the ESXI Server, go to Virtual Machines > Create/Register
VM.
-
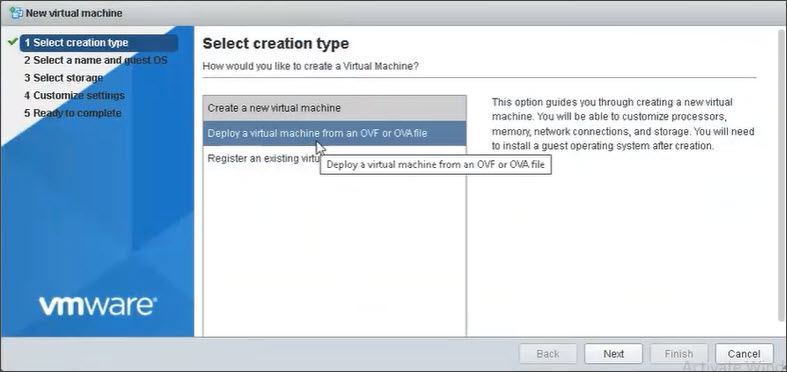
Select Deploy a virtual machine from an OVF or OVA file and click
Next
-
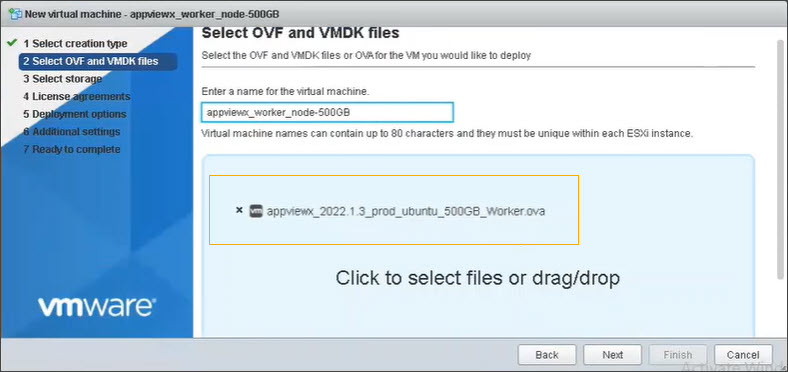
On the Source screen, Enter a name for the virtual machine in the text
field provided and select Click to select files or drag/drop option.
Click Next
-
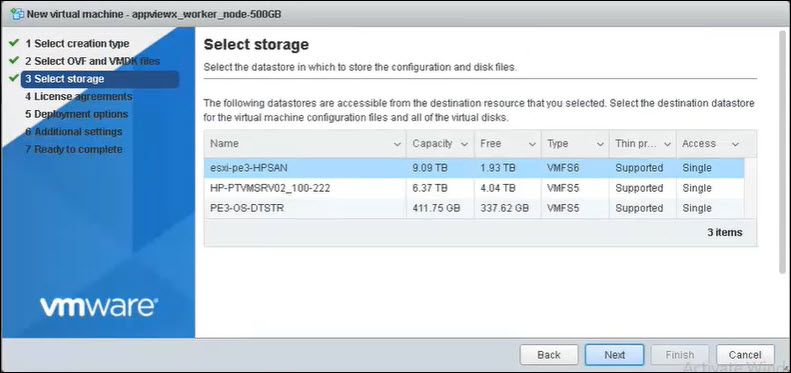
On the Select Storage screen, select a storage location and click
Next.
-
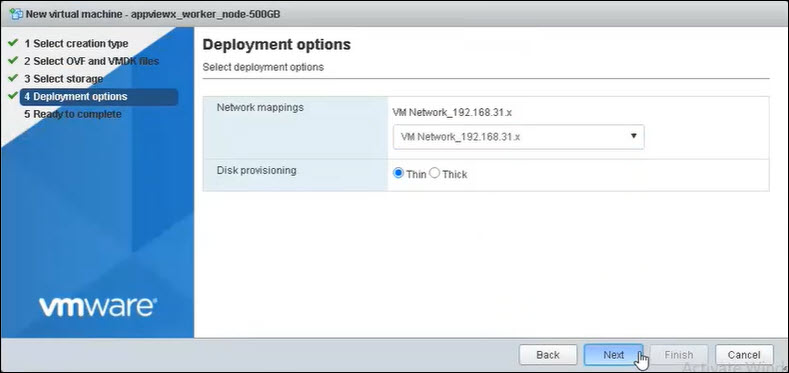
On the Deployment options screen, choose a network adapter in the Network
mappings dropdown list and select the Disk provisioning as
Thin. Click Next.
-
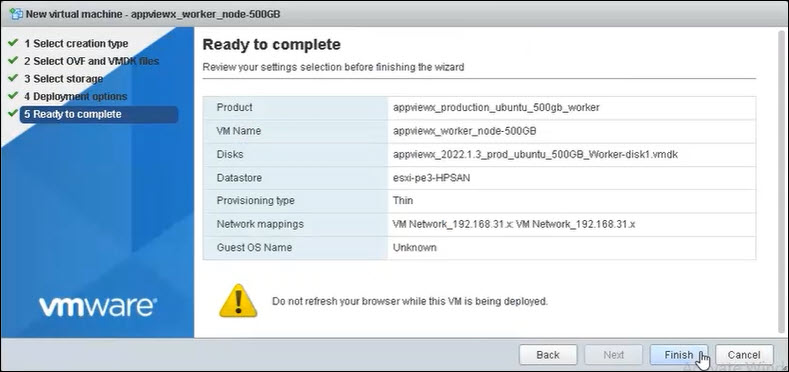
On the Ready to Complete screen click Finish to complete the OVA
deployment process.
 When the deployment wizard finishes, the AppViewX user interactive provisioning console opens within the ESXI server console section. You can use this console to set up your basic network configuration.
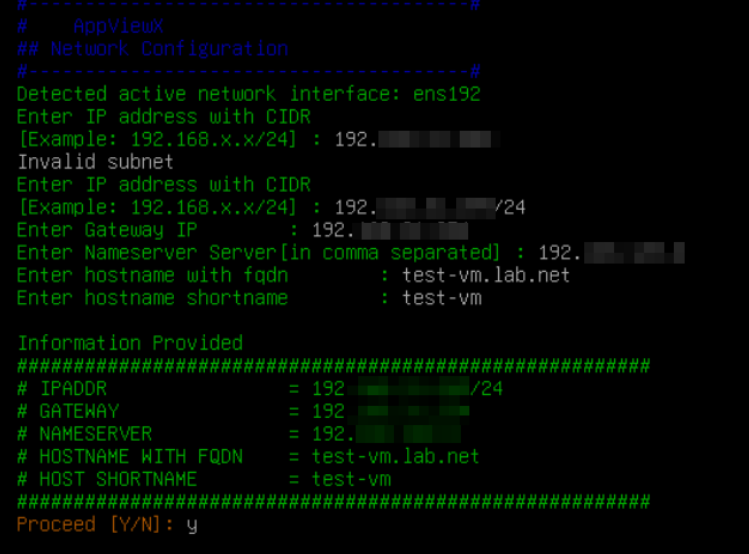
- Detected active network interface - The automation automatically detects the active network interface (for example, ens192) that will be used for network configuration.
- Enter IP address with CIDR - Provide the server IP address along
with the subnet in CIDR format.
Valid format: 192.168.1.10/24
Invalid format examples:
- 192.168.1.10 (missing CIDR)
- 192.168.1.10/ (incomplete subnet)
- 192.168.1.10/33 (invalid subnet range)
- 192.168.1/24 (invalid IP format)
- Enter Gateway IP - Provide the default gateway IP address used
for external network communication.
Valid format: 192.168.1.1
Invalid format examples:
-
192.168.1
-
192.168.1.256
-
gateway.local
-
- Enter Nameserver Server [in comma separated] - Provide one or
more DNS server IP addresses separated by commas.
Valid format: 8.8.8.8,1.1.1.1
Invalid format examples:
-
8.8.8
-
8.8.8.8;1.1.1.1 (semicolon not supported)
-
dns.google
-
- Enter hostname with FQDN - Provide the Fully Qualified Domain
Name (FQDN) of the server.
Valid format: test-vm.lab.net
Invalid format examples:
-
test-vm (missing domain)
-
.lab.net
-
test vm.lab.net (spaces not allowed)
-
- Enter hostname shortname - Provide the short hostname without the
domain name.
Valid format: test-vm
Invalid format examples:
-
test-vm.lab.net (FQDN not allowed)
-
test vm (spaces not allowed)
-
test_vm! (special characters not supported)
-
- Information Provided - The automation displays a summary of the entered network configuration details for verification before applying the changes.
- Proceed [Y/N] - Enter Y to confirm and apply the configuration,
or N to cancel and modify the entered details.
- Change Password During Boot – The automation prompts whether the
user wants to change the default passwords during the boot process.
Prompt: Do you want to change password(s) now [Y/N]:
Valid input: Y or N
Invalid input examples:
-
Yes
-
No
-
1
-
- Enter new password for appviewx – Provide the new password for
the appviewx user. The password supports a minimum of 14
characters.
Valid format: Strong password with atleast 2 uppercase, 2 lowercase, 2 number, and 2 special character with minimum 14 characters.
Valid example: Ovaa@Summer@7835672
Invalid format examples:
-
Empty password
-
password (weak password)
-
12345678 (numeric only, monotonic sequence)
-
Appviewx@72635425(contains username)
-
- Confirm password for appviewx – Re-enter the same password
entered in the previous step for confirmation.
Valid input: Same password as previously entered.
Invalid input examples:
-
Password mismatch
-
Empty confirmation password
-
- Password changed successfully – The automation updates the password for the specified user account successfully.
- Configure Password Expiry – The automation prompts whether
password expiry needs to be configured.
Prompt: Do you want to configure password expiry [Y/N]:
Valid input: Y or N
Invalid input examples:
-
yes
-
0
-
Blank input
-
- Password Expiry Options – Select the password expiry policy
option.
-
[1] Keep password never expire (99999 days)
-
[2] Set custom expiry (enter number of days)
Valid input: 1 or 2
Invalid input examples:
-
3
-
abc
-
Empty input
-
- Enter maximum days for password to expire – Provide the maximum
number of days after which the password should expire.
Valid format: Positive numeric value (example: 60)
Invalid format examples:
-
0
-
-1
-
sixty
-
Special characters
-
- Password Expiry Configuration Summary – The automation displays the configured password expiry values for verification before applying the changes.
- Proceed [Y/N] – Enter Y to confirm and apply the password expiry configuration, or N to cancel and modify the entered details.