Fortanix
Prerequisites
- The Fortanix HSM device setup should be available.
- HSM slot initialization and crypto user credential creation should be done.
- Communication to the HSM and AppViewX nodes in the case of
 and the cloud connector in the case of
  should be available to integrate with AppViewX. The port details are as
follows:
should be available to integrate with AppViewX. The port details are as
follows:- Port 443: This is the primary port used for HTTPS communication with the Fortanix DSM.
- Port 8443: This is used for administrative access to the DSM.
- Port 9443: This port is used for API access.
- The slot id and partition password from the Fortanix device should be available to use in the AppViewX.
Integrating the Fortanix HSM with the AppViewX Onprem
Generating and Uploading License
-
Login to https://license.appviewx.com/ and go to
 (Menu) > Automation >
Service Request > View/Run.
(Menu) > Automation >
Service Request > View/Run.
- From the Catalog screen, click License Generator, select Modern License Generator - For Customers and click Run.
-
Enter the details in the fields as follows:
Fields Description General *Activate License For ? Select the type of license from the dropdown list: - First time license
- Existing license
- Prospect
- Temporary
*Deployment Type Select the mode of AppViewX deployment: - Enterprise
- Provisioning
- Managed_K8s
*Environment Select the type of environment which is to be licensed. (Example: Production, Non-Production, Lab, Staging) *Activation Type Select the purpose of license activation. (Example: New, License Activation Failure) *Version Select the AppViewX version. *License Issuer Name Field is non-editable and contains the email id of the logged in issuer. *Get License Via Choose how to obtain the license: - Download
License Key *License Key Enter the license key. Note: License Key is unique to each deployment, copy license key from License info settings.Subscriptions *Account Name Select the SFDC Account name from the dropdown. *Account Owner Non-editable field populated based on the selected account name. *Subscription List of subscribed products for the selected account. Consolidated License Details Get License Summary Button to fetch the licence details. *License Meta Consolidate license summary which is used to generate license when license is not edited. *Enable HSM License This field is displayed only if the Version = 2026.2.0 or higher. Select the values as follows: - False
- True
*Number of HSM Accounts This field is displayed only if the Enable HSM License = True.
Number of HSM accounts that can be created in AppViewX from the HSM configuration page. The system stores this value as part of the license details.License Customisation *Do you want to customize License details? Select - No - the license metadata displayed is the final licence generated for the account.
- Yes - the following fields are
displayed (Enter the details for each mandatory
field)
- *Product Names
- *Invoice Number
- *Product Type
- *License Generated Date
- *License Expiry Date
- *Product Quantity
- *Final License Summary
Final Validation Validate License Click Validate License button to check if license is valid or not. *License Status Displays the validation status of the license. *Mark this is as Active ? Select yes or no, to mark the as active license. *Multi Year License Select yes or no, to mark the multi year license. Other Metadata Contains the minimum threshold values for the tenant for the following. Values can be edited. - *Tenant Type
- *Tenant Name
- *Tenant Id
- *ADC Threshold
- *Firewall Threshold
- *Cert Threshold
- *DDI Threshold
- *Threshold (Days)
* : Mandatory fields - Click Submit and download the license at the end of the Request.
-
Login to the AppViewX node.
If its a new environment, the Upload license page is displayed. proceed with uploading the license. If its an upgrade license scenario, then follow the steps below.
- Go to Menu > Platform > SYSTEM ADMINISTRATION > License, expand any of the products and click Upgrade License.
- Click Browse and select the license file to be uploaded and click Upload.
Executing the HSM Vendor Credentials Workflow (OnPrem)
-
Login to the AppViewX UI using valid credentials.
The Dashboard page is displayed by default.
-
Go
(Menu) > Automation > SERVICE REQUEST >
View/Run
The Catalog page is displayed with all the enabled workflows
- Search for HSM Vendor Credential Update.
- Select HSM Vendor Credential Update worflow and click Run.
-
Enter the fields in the HSM Details section as follows:
Table 1. Field descriptions for HSM Details section Fields Description *Enter Region Select the HSM region. *Enter Username Enter the Fortanix credentials/username. *Enter Password Enter the Fortanix credentials/password. * : Mandatory fields -
Click Submit.
The workflow is executed successfully and the Fortanix credentials are stored/pushed in the database of the selected region.
Auto-Onboarding a New HSM Account
HSM accounts provisioned through AppViewX are counted against your licensed HSM account limit.
-
Login to the AppViewX UI using valid credentials.
The Dashboard page is displayed by default.
-
Go
(Menu) > Platform > VAULT & SECURITY >
HSM
The HSM inventory page is displayed.
-
On HSM page, click Add HSM, from the navigation
pane on the left, select Fortanix.
The HSM > Add page is updated to display the fields required to integrate Fortanix with the AppViewX.
-
Enable the toggle button Setup New Account to provision and
auto-onboard a new HSM account.
The info message License Usage : 0 / X Accounts used is displayed below the field.
-
In the General Information section, enter the following fields
as follows:
Table 2. Field descriptions for General Information section Fields Description *Name Enter a name for the HSM account. Description Enter a short description for the HSM account. *Data center Select the datacenter to which the calls to HSM can be routed. *Region Select the region where the HSM is to be setup. Enable Proxy Enable the toggle button to communicate to the HSM through the node without any internet connection. * : Mandatory fields -
Click Setup and Onboard.
The HSM account is created and displayed in the HSM inventory with the tag as Auto-Onboarded.
Steps to Integrate
- Login to the AppViewX server on which the AppViewX is installed.
- From the command line interface, navigate to the properties folder path: {APPVIEWX_INSTALLATION_PATH}/appviewx_dependencies/properties
-
Open the hsm file using the following command:
vi hsm -
Check and confirm if the HSM file has the following lines. If not,
uncomment the following lines:
export FORTANIX_PKCS11_CONFIG_PATH= /appviewx/dependencies/hsm/fortanix/pkcs11.confecho "FORTANIX Config Path : $FORTANIX_PKCS11_CONFIG_PATH" -
If the file is edited, you have to restart the avx-platform-hsm pod,
using the following commands:
kubectl get pods -n <namespace>kubectl delete pods -n <namespace> <PodName> -
Login to the AppViewX UI using valid credentials.
The Dashboard page is displayed by default.
-
Go
(Menu) > Platform > VAULT & SECURITY >
HSM
The HSM inventory page is displayed.
-
On HSM page, click Add HSM, from the navigation
pane on the left, select Fortanix.
The HSM > Add page is updated to display the fields required to integrate Fortanix with the AppViewX.
-
In the General Information section, enter/select the following
details:
Table 3. Field descriptions for General Information Field Description Setup New Account Toggle button to auto-onboard the HSM account. Keep the button disabled to perform the manual onboarding. *Name Enter a name for this integration. Description Enter a description for this integration. Connection Mode Select whether your application integrates with the Fortanix HSM using the below interfaces: - PKCS11
- SDK
HSM usage Select an HSM usage from the following options: - CSR generation
- Master
key encryption
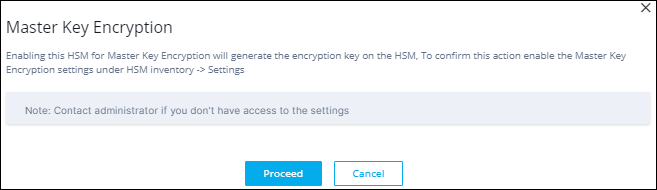
Click Proceed.
To confirm this action enable the Master Key Encryption settings under HSM inventory > Settings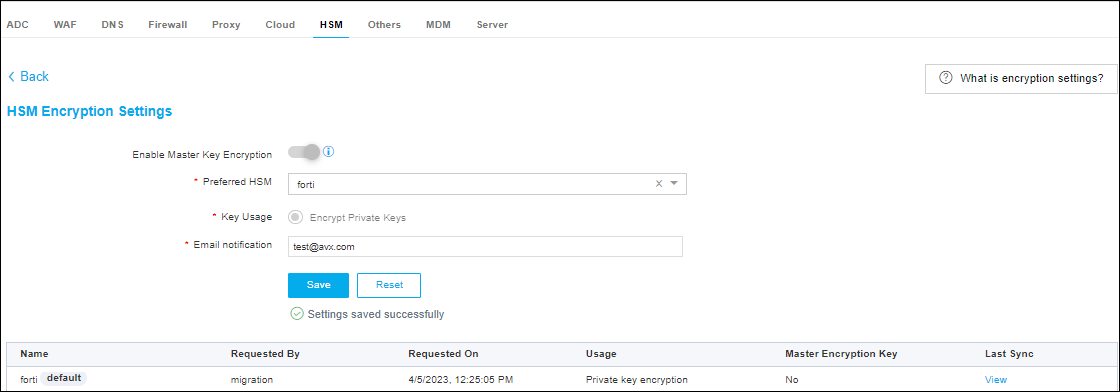
- Code Signing
- All
*Data center Select the required data center from the list of applicable values in the dropdown menu. * : Mandatory fields -
In the Vendor specific details section, enter/select the
following details:
Table 4. Field descriptions for Vendor specific details Field Description FIPS Mode Enable the toggle to switch On for FIPS mode. *API Key Unique identification number of the slot in the HSM will be used to communicate with the end HSM device. Enter the API key. *Key handler name A reference name to create a Master Encryption key in HSM. This enables us to pick the right MEK for crypto operations over KEK. *So file This field is enabled when the Connection Mode = PKCS11 The shared object (.so) file is used to facilitate the communication between the HSM and AppViewX. To upload the .so file:
- Click Browse.
- Navigate to the location of the .so file.
- Select the .so file, and click Open.
*Config file This field is enabled when the Connection Mode = PKCS11 The Config file containing connection and environment settings is used to facilitate the communication between the HSM and AppViewX. To upload the .conf file:
- Click Browse.
- Navigate to the location of the .conf file.
- Select the .conf file, and click Open.
*API URL This field is enabled when the Connection Mode = SDK Enter the endpoint URL for the Fortanix API that AppViewX uses to communicate with the Fortanix service.
* : Mandatory fields - Click Save.
-
Scroll to the end of this page to view the table or navigate to HSM
inventory to view the HSM status. If the HSM has been configured
correctly, the status for the HSM will be set to Available after
checking the encryption and decryption logic. If the Status is Not
Available:
- Check the installation path for the HSM.
- Ensure that all required permissions have been enabled.
- Go to Logs > Logging :: All. Search with HSM and see the Log message.
- If the implementation type is CSR Generation, refer to the CLM User Guide for steps on how to generate a CSR.
Integrating the Fortanix HSM with the AppViewX SaaS
Enabling HSM with License
- * Enable HSM License - Toggle this option to enable the HSM license.
- * Number of Allowed HSM Accounts - Number of HSM accounts that can be created in AppViewX from the HSM configuration page. The system stores this value as part of the license details.
- This feature applies only to AppViewX version 2026.2.0 or later.
- The system supports this feature only when the selected products on the Add Tenant page use a production license.
- Only SREs can add tenants.
Executing the HSM Vendor Credentials Workflow (SaaS)
-
Login to the AppViewX UI using valid credentials.
The Dashboard page is displayed by default.
-
Go
(Menu) > Automation > SERVICE REQUEST >
View/Run
The Catalog page is displayed with all the enabled workflows
- Search for SaaS HSM Vendor Credential Update.
- Select SaaS HSM Vendor Credential Update worflow and click Run.
-
Enter the fields in the Upload Details section as follows:
Table 5. Field descriptions for Upload Details section Fields Description *Select Region Select the cluster region. *Select Cluster Select the specific cluster(s). * : Mandatory fields -
Enter the fields in the HSM Details section as follows:
Table 6. Field descriptions for HSM Details section Fields Description *Enter Region Select the HSM region. *Enter Username Enter the Fortanix credentials/username. *Enter Password Enter the Fortanix credentials/password. * : Mandatory fields -
Click Submit.
The workflow is executed successfully and the Fortanix credentials are stored/pushed in the database of the selected region.
Auto-Onboarding a New HSM Account
HSM accounts provisioned through AppViewX are counted against your licensed HSM account limit.
-
Login to the AppViewX UI using valid credentials.
The Dashboard page is displayed by default.
-
Go
(Menu) > Platform > VAULT & SECURITY >
HSM
The HSM inventory page is displayed.
-
On HSM page, click Add HSM, from the navigation
pane on the left, select Fortanix.
The HSM > Add page is updated to display the fields required to integrate Fortanix with the AppViewX.
-
Enable the toggle button Setup New Account to provision and
auto-onboard a new HSM account.
The info message License Usage : 0 / X Accounts used is displayed below the field.
-
In the General Information section, enter the following fields
as follows:
Table 7. Field descriptions for General Information section Fields Description *Name Enter a name for the HSM account. Description Enter a short description for the HSM account. *Data center Select the datacenter to which the calls to HSM can be routed. *Region Select the region where the HSM is to be setup. Enable Proxy Enable the toggle button to communicate to the HSM through the node without any internet connection. * : Mandatory fields -
Click Setup and Onboard.
The HSM account is created and displayed in the HSM inventory with the tag as Auto-Onboarded.
Steps to Integrate
- Login to the AppViewX server on which the Cloud Connector is installed.
- From the command line interface, navigate to the properties folder path: {CC_INSTALLATION_PATH}/deps/properties
-
Open the hsm file using the following command:
vi hsm -
Check and confirm if the HSM file has the following lines. If not,
uncomment the following lines:
export FORTANIX_PKCS11_CONFIG_PATH= /appviewx/dependencies/external_libs/hsm/fortanix/pkcs11.confecho "FORTANIX Config Path : $FORTANIX_PKCS11_CONFIG_PATH" -
If the file is edited, you have to restart the avx-mid-server-platform
pod, using the following commands:
kubectl get pods -n <namespace>kubectl delete pods -n <namespace> <PodName> -
Login to the AppViewX UI using valid credentials.
The Dashboard page is displayed by default.
-
Go
(Menu) > Platform > VAULT & SECURITY >
HSM
The HSM inventory page is displayed.
-
On HSM page, click Add HSM, from the navigation
pane on the left, select Fortanix.
The HSM > Add page is updated to display the fields required to integrate Fortanix with the AppViewX.
-
In the General Information section, enter/select the following
details:
Table 8. Field descriptions for General Information Field Description *Name Enter a name for this integration. Description Enter a description for this integration. HSM usage Select an HSM usage from the following options: - CSR generation
- Master key encryption
- Code Signing
- All
*Data center Select the required data center from the list of applicable values in the dropdown menu. * : Mandatory fields -
In the Vendor specific details section, enter/select the
following details:
Table 9. Field descriptions for Vendor specific details Field Description FIPS Mode Enable the toggle to switch On for FIPS mode. *API Key Unique identification number of the slot in the HSM will be used to communicate with the end HSM device. Enter the API key. *Key handler name A reference name to create a Master Encryption key in HSM. This enables us to pick the right MEK for crypto operations over KEK. *So file The SO file is used to facilitate the communication between the HSM and AppViewX. To upload the .so file: - Click Browse.
- Navigate to the location of the .so file.
- Select the .so file, and click Open.
*Config file The Config file is used to facilitate the communication between the HSM and AppViewX. To upload the .conf file: - Click Browse.
- Navigate to the location of the .conf file.
- Select the .conf file, and click Open.
* : Mandatory fields - Click Save.
-
Scroll to the end of this page to view the table or navigate to HSM
inventory to view the HSM status. If the HSM has been configured
correctly, the status for the HSM will be set to Available after
checking the encryption and decryption logic. If the Status is Not
Available:
- Check the installation path for the HSM.
- Ensure that all required permissions have been enabled.
- Go to Logs > Logging :: All. Search with HSM and see the Log message.
- If the implementation type is CSR Generation, refer to the CLM User Guide for steps on how to generate a CSR.
Configuring Fortanix HSM using Proxy
Format for the environment variable
-
If the proxy is http
export FORTANIX_PROXY=http://<username>:<password>@<proxy_server_ip>:<proxy_server_port> -
If the proxy is https
export FORTANIX_PROXY=https://<username>:<password>@<proxy_server_ip>:<proxy_server_port>
Consider the following proxy details:
Proxy IP: 199.199.199.199
Proxy Port: 9999
Username: testuser
Password: Testuser@123
export FORTANIX_PROXY=http://testuser:Testuser%[email protected]:9999| Special Character | Encoding |
|---|---|
| @ | %40 |
| : | %3A |
| # | %23 |
| ? | %3F |
| / | %2F |
| & | %26 |
| = | %3D |
| + | %2B |
| Space ( ) | %20 |
These encodings are required as all the linux distros considers
- @ separates credentials from the host
- : separates username and password
- # denotes a fragment, which is ignored
- &, ?, and others have special meanings in query strings
If the password contains these characters and are left un-encoded, such characters may cause the URL parser to misinterpret the proxy string, leading to authentication failures or incorrect proxy behavior. Percent-encoding ensures that the credentials are correctly parsed and securely transmitted.
OnPrem Proxy Configurations
-
Execute the command below. Provide the datacentre in the
<namespace>.
kubectl get pods -n <namespace> -
Login into the HSM pod using the command below.
kubectl exec -it <hsm_pod_name>-n <namespace> -- bash -
Go to this location /appviewx/dependencies/properties/ and
execute the command below.
vi hsm -
Now, add the following environmental variable which has been formed
using the above format.
export FORTANIX_PROXY=http://testuser:Testuser%[email protected]:9999 - Once added, exit the pod and restart the HSM pod.
- After the pod has restarted, update the HSM in the AppViewX application.
SaaS Proxy Configurations
- Login into the cloud connector server.
-
Login into the pod using the command below.
./k3s kubectl exec -it <mid-server-platform-pod-name> -n cc -- bash -
Go to this location /appviewx/dependencies/properties/ and
execute the command below.
vi hsm -
Now, add the following environmental variable which has been formed
using the above format.
export FORTANIX_PROXY=http://testuser:Testuser%[email protected]:9999 - Once added, exit the pod and restart the platform midserver pod.
- After the pod has restarted, update the HSM in the AppViewX application.