Trustwave CA
Prerequisites
- Trustwave API URL. Ex: https://testapi.ssl.trustwave.com/3.0/
- Reachability from AppViewX southbound to Trustwave API URL via proxy or direct internet connection
- Valid credentials for communicating to Trustwave CA via API
- Reseller id
- Account details provided in Trustwave account such as Organization Name, Email address, Organization Address, City, State, Zip code, Country, Phone number
- AppViewX server should either have internet access or have a proxy configured in AppViewX general settings. Check Proxy Setup for the steps to configure the proxy. https://adminguide.appviewx.com/proxy-4
Configuring Trustwave CA
- Go to > > > .
- Click the +Add icon on the top right of the page.
- Select the Trustwave in the left side vendor list.
-
Configure the General Information details as follows:
- CA Account name - Provide an account name for the CA setting.
-
Purpose/Usage - Choose the certificate categories that will be managed by
this setting. Possible certificate categories could be:
- Server
- Code Signing
- Proxy Required - Enable this field if the CA communication needs to happen via Proxy.
-
Choose the appropriate Data Center.
-
Configure the CA Configuration with information you want to configure:
- API URL: The Trustwave API URL to communicate. Ex: https://testapi.ssl.trustwave.com/3.0/
- Username: The username for API authentication.
- Password: The password for API authentication.
- Reseller ID: The Reseller Id for the account.
-
Configure the Account Details with information you want to configure:
- Name: The Organization name given in the Trustwave account.
- Email Address: The Administrator or organization email address given in the Trustwave account.
- Address: The Organization Address given in the Trustwave account.
- City: The city name given in the Trustwave account.
- State: The state name given in the Trustwave account.
- Zip code: The zip code given in the Trustwave account.
- Country: The country code given in the Trustwave account. Ex: US.
- Phone number: The phone number given in the Trustwave account.
- Click Save.
Validating Trustwave
- Go to > > >
-
Select the Trustwave in the left side vendor list
The newly created and older settings are displayed in the grid.
-
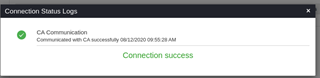
Click Check to validate the CA setting that is created.
The CA communication will be validated and the Connection Status will be shown as either Success or Failure.