Enroll Certificate With ServiceNow
To trigger this workflow:
-
From the Certificate Lifecycle Automation catalog, under the Enrollment
category, hover your mouse over the Enroll Certificate with ServiceNow workflow and
click
 .
Tip: You can also search for the workflow by typing the workflow name in the search bar.The workflow execution page is displayed with the workflow inputs requested at the first stage.
.
Tip: You can also search for the workflow by typing the workflow name in the search bar.The workflow execution page is displayed with the workflow inputs requested at the first stage. -
Under the Certificate Details section, select the requested field information as
described in the table below.
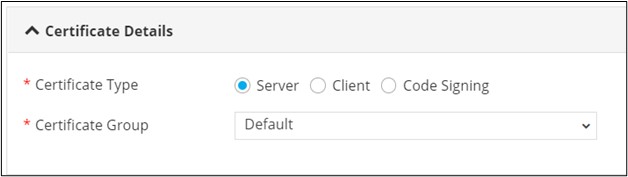
Table 1. Field description for Certificate Details section Field Description *Certificate Profile Select the required Certificate Profile from the available options: - Server
- Client
- Code Signing
Note: Server is the default selection.*Certificate Group Select the required Certificate Group from the options available in the dropdown. All asterisk (*) marked fields are mandatory. -
Under the CA Details section, enter or select the requested field information
described in the table below.
Table 2. Field description for CA Details section Field Description *Certificate Authority Select the Certificate Authority from the available options: - DigiCert
- Entrust
- EJBCA
- Microsoft Enterprise
- AppViewX
*CA Account Select the CA Account from the options available in the dropdown. Note: This field is populated based on the CA selected.*Division Select the Division from the options available in the dropdown. Note: This field is displayed only when DigiCert is selected as the CA.*Cert Type Select the Cert Type from the options available in the dropdown. Note: This field is displayed only when DigiCert or Entrust are selected as the CA.Description Provide a Description for the workflow, if required. All asterisk (*) marked fields are mandatory. -
Under the CSR Parameters section, enter or select the requested field
information described in the table below.
Table 3. Field description for CSR Parameters section Field Description *Common Name Enter the Fully qualified domain name (FQDN) of the server for which the certificate is requested. *Subject Alternative Name (SAN) Select the SAN as either: - DNS
- IP Address
DNS Enter a valid DNS if you select the DNS option in the SAN field. IP Address Enter a valid IP Address if you select the IP Address option in the SAN field. *Organization Enter the name of the organization . Organization Unit Enter the name of the organization unit with which the certificate will be associated. Organization Address Enter the address of the organization. State Enter the name of the state in which the organization is located. Country Enter the name of the country in which the organization is located. Zip Code Enter the zip code of the organization. Note: This field is displayed only when DigiCert is selected as the CA.Email Address Enter the email address Locality Enter the name of the locality in which the organization is situated. *Validity Unit Select the validity unit as: - Days
- Months or
- Years
*Validity Value Select a valid validity value. *Key Type Select a Key Type from the available options - RSA, DSA, EC. *Bit Length Select the Bit Length from the available options. The values displayed in the dropdown will differ depending on the Key Type selected. *Hash Function Select the Hash Function from the available options. *Download Format Select the format for downloading the certificate from the available options. All Asterisk (*) marked fields are mandatory. - Under the Certificate Attributes section, select the Attribute from the available options.
-
Enter a value for the selected attribute.
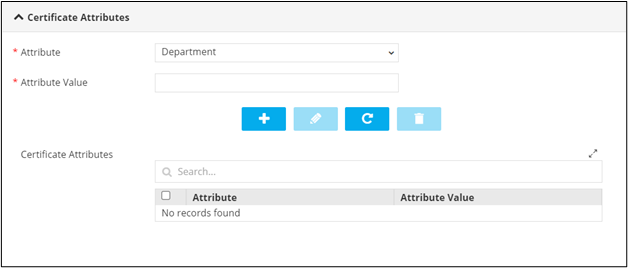
Table 4. Actions available in the Certificate Attributes grid Action Description 
Allows you to add the attribute to the Certificate Attributes grid. 
Allows you to edit the value of a particular attribute. You can do this by selecting the attribute in the grid, click , enter the new value for the attribute, and click
again.
Allows you to delete a certificate attribute. 
Allows you to maximize the Certificate Attributes grid. Search bar Allows you to search for a particular attribute in the grid. -
Under the Vendor Specific Details section, select the field information from the
options available in the dropdown.
Note: This section is displayed only when DigiCert or EJBCA is selected as the Certificate Authority under the CA Details section. The field(s) displayed will vary based on the CA selected.
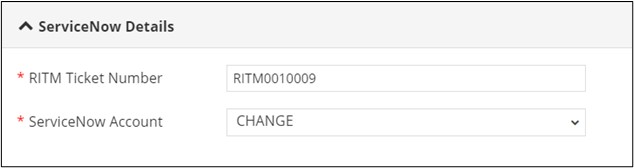
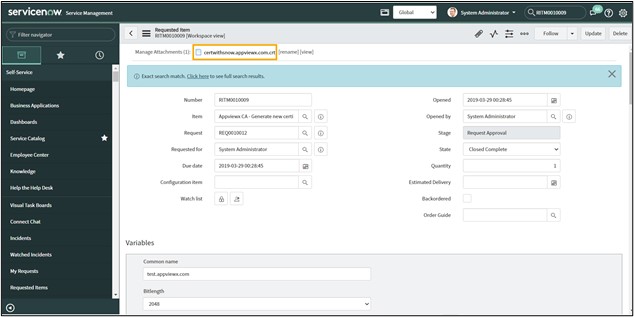
- Under the ServiceNow Details section, enter the RITM ticket Number (mandatory).
-
Under the ServiceNow Details section, select the ServiceNow Account
(mandatory).
- Under the Notifications section, enter the email address to which the certificate details have to be sent.
-
Click Submit.
AppViewX Certificate is created successfully and the RITM ticket status updated. The certificate is updated in the ServiceNow ticket.
-
To download the certificate, at the View and Download Certificate stage, hover
your mouse over
 and from
the options displayed, click Download Certificate.
and from
the options displayed, click Download Certificate.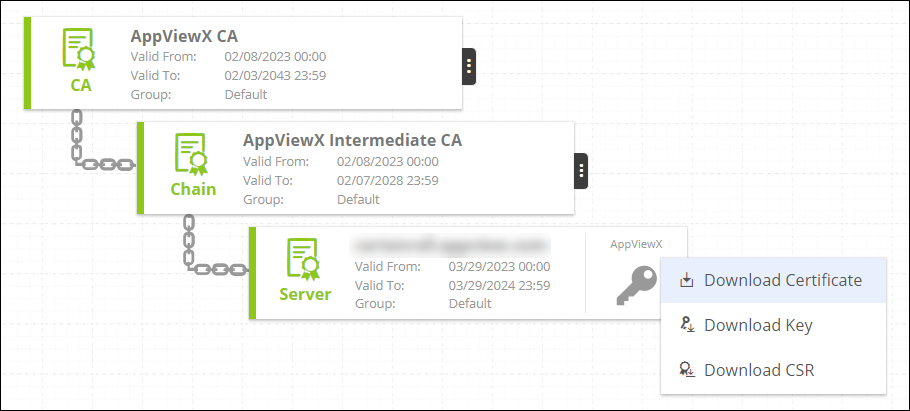
-
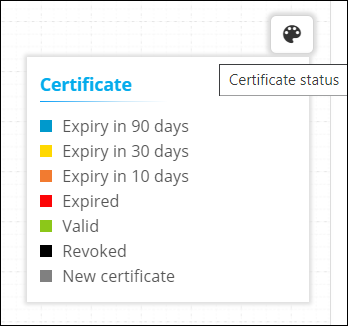
Hover your mouse over
 to
view the Certificate status.
to
view the Certificate status.