
Remote Mode
- Add the MCP Server URL
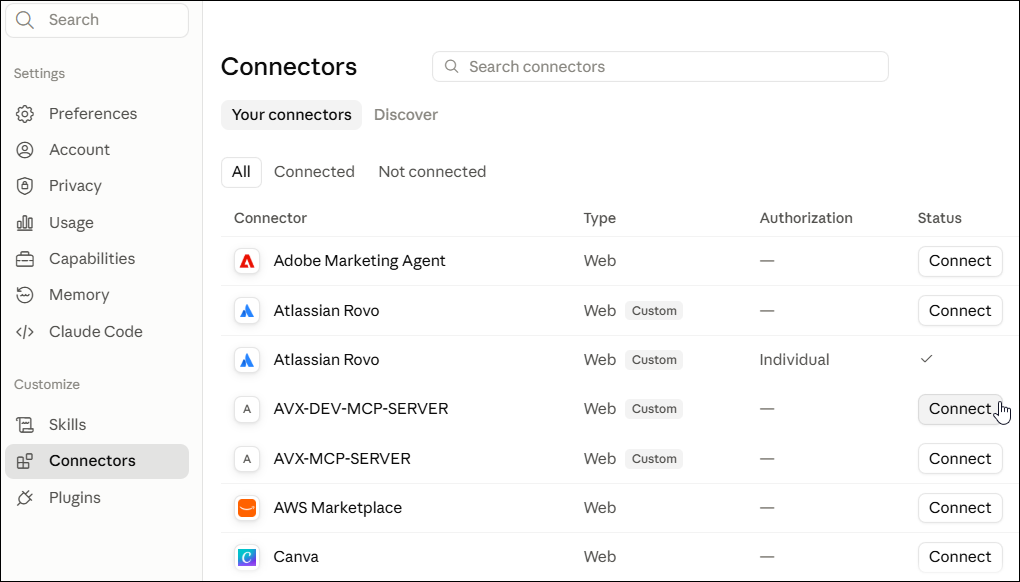
Open your AI client's connector or MCP settings and enter the AppViewX MCP Server URL.
- Initiate the connectionYour AI client establishes the MCP connection and automatically opens a browser-based OAuth consent page.
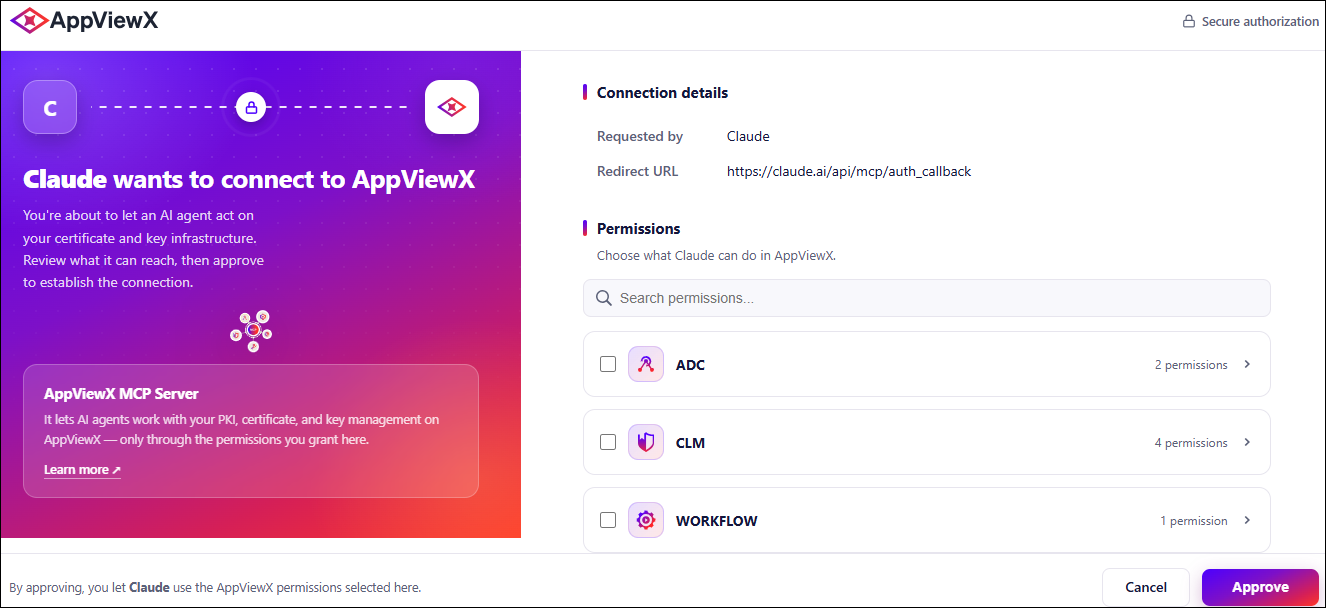
- Select scopes and approveReview the list of available permission scopes, select the ones you need, and approve the authorization request.
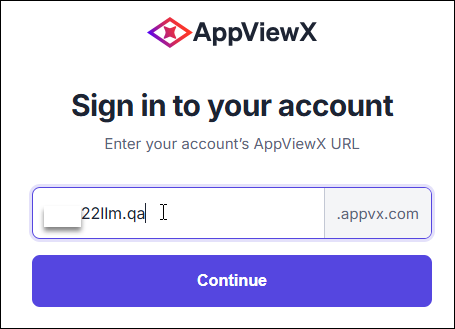
- Identify your AppViewX instanceWhen prompted, enter your AppViewX tenant name or subdomain to point the server to your specific instance.
- Sign in to your tenant
You are redirected to your tenant's login page. Sign in using your AppViewX credentials.
- Receive the OAuth token
AppViewX issues an OAuth token and redirects you back to your AI client. The connection is now authenticated.
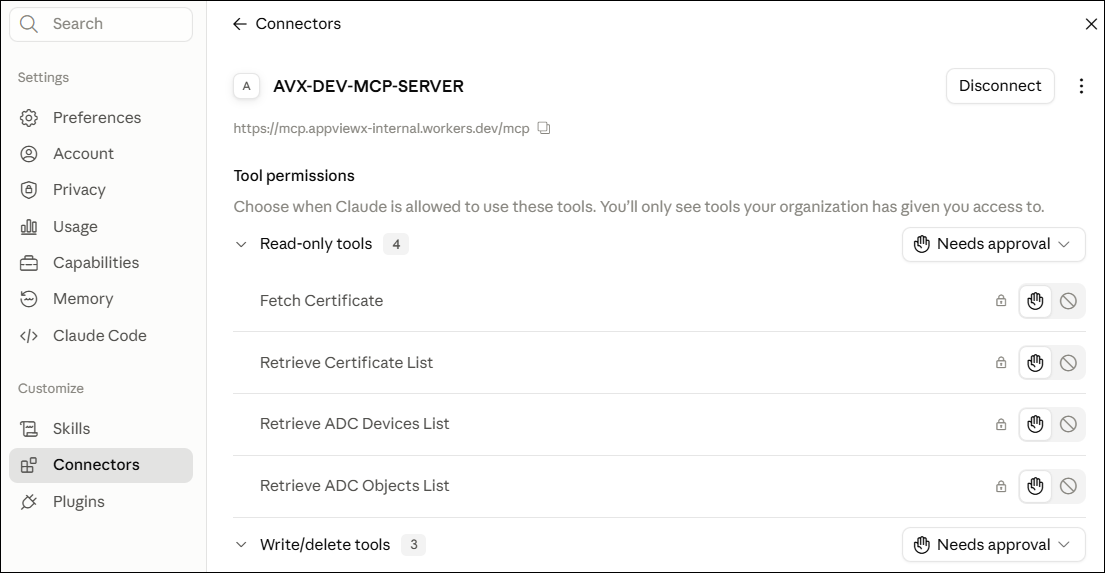
- Tools are discovered and returnedThe MCP Server inspects your tenant's active product licenses and the scopes you granted, then returns the matching set of tools to your AI client. Only tools your license and permissions cover will be available.
What's Available Today
| Tool | Type | Scope | Input / Lookup by | Returns |
|---|---|---|---|---|
| CLM | ||||
fetch-certificate-listSearch and filter the certificate inventory with server-side filters and pagination. |
Read | cert:fetch |
category, expiryStatus, expiryBetween, certStatus, certificateAuthority, discoverysource, subject fields, max, start. | Paginated certificate list with commonName, serialNumber, resourceId, status, avxStatus, issuer details, key info, validity dates. |
fetch-certificateRetrieve full details for a single certificate. |
Read | cert:fetch |
Lookup by: certificateUuid, resourceId. | Paginated certificate list with commonName, serialNumber, resourceId, status, avxStatus, issuer details, key info, validity dates, and discovery sources. |
certificate-renewSubmit an asynchronous renewal request for a certificate. |
Write | cert:renew |
resourceId, or commonName + serialNumber. Optional: csrContent. | 202 Accepted status, requestId (work order ID), resourceId. |
certificate-revokeRevoke a certificate using an RFC 5280 reason code. |
Write | cert:revoke |
resourceId, or commonName + serialNumber. certificateAuthority, revocationReason (required). Optional: comments. | 202 Accepted status and requestId for the revocation work order. |
certificate-regenerateGenerate a new key pair and certificate while preserving the existing configuration. |
Write | cert:regenerate |
resourceId, or commonName + serialNumber. Optional: csrContent. | 202 Accepted status, requestId (work order ID), resourceId, and newResourceId of the newly generated certificate. |
| Workflow | ||||
get-cert-workorder-statusCheck the step-by-step workflow status of a pending request. |
Read | workflow:status |
requestId returned by any lifecycle action tool. | Each workflow step with its name and current status: Success, In Progress, or Failed. |
| ADC | ||||
fetch-device-list-based-on-filterRetrieve device inventory details for ADC devices configured in AppViewX. |
Read | adc:device:fetch |
Filter by: name, ip, fqdn, dataCenter, vendor, status,
version, or free-text keyword search. The AI maps natural language to the correct filters automatically. Supports pagination with max and start parameters. |
Retrieves ADC devices using filter criteria. Supports filtering by vendor, IP address, FQDN, device status, HA configuration, data center, and firmware version. |
fetch-objects-based-on-filter Retrieve ADC
object details including virtual servers, pools, monitors, and
topology metadata. |
Read | adc:objects:fetch |
Filter by: name, ip, fqdn, parentName, code, partition,
status, deviceName, vendor, isOrphan, or free-text keyword
search. Supports pagination with max and start parameters. Supported ADC object types: Wide IP, GTM pool, GTM pool member, virtual server, LTM pool, LTM pool member, profiles, iRules, policies, monitors, DataScript, IPGroup, DNS loadbalancer, HTTP/TCP load balancer |
Retrieves ADC objects using filter criteria. Supports virtual servers, pools, pool members, wide IPs, profiles, iRules, and monitors. |
OAuth Scopes
The MCP Server validates the granted scopes for every tool call. Scopes are independent of each other. Grant only the scopes required for your tasks.
| Scope | What it covers | Current tools using this scope |
|---|---|---|
cert:fetch |
Read access to certificate and infrastructure data. | fetch-certificate,
fetch-certificate-list |
cert:renew, cert:revoke,
cert:regenerate |
Write operations on certificates, including renewal, regeneration, and revocation. | certificate-renew,
certificate-regenerate,
certificate-revoke |
workflow:status |
Executing and monitoring automation workflows, including checking approval states. | workflow-request-status |
Getting Started
- Create a service account in AppViewX.
- Download and extract the MCP Server.
- Configure your AI client.
- Verify the connection.
Prerequisites
| Requirement | Details |
|---|---|
| AppViewX | Version 2026.3.0 or later, SaaS deployment. |
| User email address | Your AppViewX user account must have a valid email address configured. This is required for the OAuth login flow. Without it, authentication will fail. |
| MCP Server Access permission | Your AppViewX role must include the MCP Server Access permission. Navigate to Permissions in the AppViewX Platform and confirm this is enabled for your role. If it is not, contact your administrator. Without this permission, tool discovery fails immediately after login before any tools are returned. |
| AI Client | Claude Web (claude.ai), Claude Desktop, VS Code with GitHub Copilot, ChatGPT (via plugins), Cursor, or any MCP-compatible HTTP client. Use the latest available version. |
| AppViewX MCP Server URL | The production URL is
https://mcp.appvx.com/mcp. |
| Tenant name or subdomain | Your AppViewX tenant subdomain. You enter this during the browser login step not in the client configuration. |
https://mcp.appvx.com/mcp before you begin
setup.Setting Up Remote Mode
Prerequisites
- Email address: Your AppViewX account must have a valid email address. The OAuth login flow requires this. If your account has no email, authentication will fail.
- MCP Server Access permission: Navigate to in AppViewX and confirm the MCP Server Access permission is enabled for your role. Without this, tool discovery fails immediately after login before any tools are returned. Contact your administrator if the permission is missing.
Step 1: Add the AppViewX MCP Server in Your AI Client
https://mcp.appvx.com/mcp. All SaaS tenants use the same
URL there is no tenant-specific URL to configure. Add this URL in your AI
client using the instructions for your client below.https://mcp.appvx.com/mcp) before
you begin setup.Claude Web / Claude Desktop
- Open Claude Web and go to Settings.
- Select Connectors.
- Click Add a custom connector.
-
Enter a name and paste the AppViewX MCP Server URL:
https://mcp.appvx.com/mcp.Example name: AppViewX
- Click Continue. Accept the defaults on the following screen.
-
Click Connect.
The browser-based login flow starts automatically. Continue to Step 2.
VS Code GitHub Copilot
- Press Ctrl+Shift+P and select MCP: Open User MCP Configuration.
-
Add the
avx-mcp-serverentry to theserversobject:{ "servers": { "avx-mcp-server": { "type": "http", "url": "https://mcp.appvx.com/mcp" } } } -
Save the file (Ctrl+S).
The browser-based login flow starts automatically. Continue to Step 2.
Other MCP-Compatible Clients
https://mcp.appvx.com/mcp as an MCP server or
plugin URL in your client's settings. Use "type":
"http" where applicable. The browser-based login flow
described in Step 2 applies to all supported clients.Step 2: Complete the Browser-Based Login
2a. Grant OAuth Scopes
-
Review the listed scopes and select the scopes you need:
avx:readfor querying certificates and ADC resources (read-only)avx:certificate:writefor renewing, regenerating, or revoking certificatesavx:workflow:executeto check the status of certificate workflow requests (renewals and regenerations pending approval)
- Leave other scopes unselected unless you know you need them.
- Click Approve.
2b. Enter Your Tenant Name
-
Enter your tenant name.
This is the subdomain part of your AppViewX URL. For example, if your AppViewX instance is
companyname.appvx.com, enter companyname. -
Click Continue.
You are redirected to your tenant's AppViewX login page.
2c. Log In to AppViewX
- Authenticate with your AppViewX credentials on your tenant's login page.
-
After successful login, you are automatically redirected back
to your AI client.
The MCP Server performs tool discovery and returns the tools available for your tenant and your granted scopes.
avx:read, you see read tools from both CLM and
ADC. If you hold only a CLM license, you see only CLM tools
regardless of the scopes you selected.Step 3: Verify the Connection
- AppViewX tools should be listed in the available tools panel.
- Send the test prompt: Show me available tools in AppViewX MCP.
- Press Ctrl+Shift+P and select MCP: Show Installed Servers.
- The entry
avx-mcp-servershould show status Running with a non-zero tool count.
The AppViewX MCP Server is now ready.
Using the AppViewX MCP Server
The following sections describe each available tool, its inputs, and example prompts.
Query Certificate Inventory
fetch-certificate-listSearches and filters the AppViewX certificate inventory. The AI assistant maps your natural language request to the correct filter parameters automatically.
-
Type a natural language query in your AI assistant describing the
certificates you want to find.
Example prompts:
- Get all the server certificates.
- Get the certificates that are expiring in 09/26/2026.
- Get the certificates that are discovered from ptpld260, which is expired already.
- Renew the certificates which are expiring next month, issued from AppViewX CA, from OU IoT.
- Show certificates expiring in 90 days across all categories.
-
Review the results returned by the AI assistant.
The assistant returns a paginated list of certificates matching your criteria. Each record includes:
commonName,serialNumber,resourceId,status,avxStatus, issuer details, key information, and validity dates. - To retrieve the next page, ask the AI assistant to continue or specify the next starting record.
resourceId from any
returned record as input to the fetch-certificate,
certificate-renew, certificate-revoke, or
certificate-regenerate tools.Get Certificate Details
fetch-certificateRetrieves the full details of a single certificate, including key algorithm and size, SANs, issuer details, compliance status, thumbprint, and discovery sources.
-
Provide the certificate identifier in your prompt.
Example prompts:
- Get the certificate detail of the certificate with UUID: 45e43ee2186e1c4944f9ff02a73a193112f55247.
-
Review the full certificate record returned by the AI assistant.
The assistant returns the complete certificate profile, including: common name, serial number, resource ID, validity dates, issuer common name, Certificate Authority, issuer settings name, organization, key algorithm, key size, signature algorithm, key usage, extended key usage, thumbprint, SAN entries, compliance status, and discovery sources.Note: A single query can invoke multiple tools in combination. For example, a request like "renew all server certificates expiring in the next 30 days" would use the fetch-list tool (to identify matching certificates) followed by the renew tool (to renew each one), and so on for similar multi-step queries.
Renew a Certificate
certificate-renewSubmits a renewal request through AppViewX's configured workflow. Renewal runs asynchronously. A work order ID is returned immediately so you can track progress.
get-cert-workorder-status to track the renewal
progress.-
Identify the certificate to renew and provide its identifier in your
prompt.
Example prompts:
- Renew the certificate which has the serial number 6D:AB:04:35:26:DC:82:1D:33:26:DD:28:3C:7D:31:79.
- Renew the certificate codesign-cert-test-01.app.com.
- Renew the certificates which are expiring next month, issued from AppViewX CA, from OU IoT.
Provide one of the following identifiers:- resourceId the AppViewX resource ID.
- commonName + serialNumber the certificate common name combined with its serial number.
Optional parameters:- csrContent a custom CSR to use during renewal. Supported for DigiCert and HydrantID CAs. For CAs that do not support CSR upload during renewal, this field is ignored and the existing CSR is used automatically.
-
If the AI assistant finds more than one certificate with the same
common name, select the correct certificate from the list it
presents.
Important: When multiple certificates share the same common name, the AI assistant displays each one with its serial number, validity dates, and asks you to confirm your selection before proceeding. This prevents accidental renewal of the wrong certificate.
- Confirm the renewal when prompted by the AI assistant.
- HTTP status: 202 Accepted
- Work order ID (
requestId) use this withget-cert-workorder-statusto track the renewal workflow. - The resource ID of the acted-on certificate
(
resourceId).
Revoke a Certificate
certificate-revokeRevokes a certificate asynchronously through the AppViewX workflow using an RFC 5280 reason code. The AI assistant surfaces the reason codes and asks for explicit confirmation before submitting the request.
fetch-certificate before confirming the revocation.
Revocation via MCP uses the workflow path only. Policy-engine-based
revocation is not supported in this release.-
Type a revocation request in your AI assistant, or enter
/certificate-revoke to start a guided
revocation flow.
Example prompts:
- Revoke the certificate with resource id 6a8e65e5f467261a8b110556, revoke reason as key compromise.
- Revoke old.example.com reason: cessation of operation.
-
Provide the certificate identifier, Certificate Authority, and
revocation reason when requested by the AI assistant.
Required inputs:
- Certificate identifier provide one of:
- resourceId the AppViewX MongoDB resource ID. Preferred — avoids ambiguity when multiple certificates share a common name.
- commonName + serialNumber the certificate common name combined with its serial number.
- certificateAuthority the CA that issued the certificate. Required for correct routing of the revocation request.
- revocationReason the RFC 5280 reason code (0–10) or
plain-text phrase. Defaults to
0(Unspecified) if not provided.
Revocation reason codes (RFC 5280):Code Reason 00 Unspecified 01 Key Compromise 02 CA Compromise 03 Affiliation Changed 04 Superseded 05 Cessation Of Operation 06 Certificate Hold 09 Privilege Withdrawn 10 AA Compromise Optional inputs:- comments an audit note attached to the revocation request.
- Certificate identifier provide one of:
-
Confirm the revocation when the AI assistant presents the certificate
details and prompts for confirmation.
The AI assistant displays the certificate identifier, CA, and reason code, and warns that the action is irreversible before proceeding.
- HTTP status: 202 Accepted
- Work order ID (
requestId) use this withget-cert-workorder-statusto track the revocation workflow.
Regenerate a Certificate
certificate-regenerateRegenerates a certificate with a brand-new key pair while preserving the original certificate's configuration subject, SANs, CA settings, and template. Use regeneration when you need a new private key, as distinct from a routine renewal.
get-cert-workorder-status to
track each workflow step.-
Provide the certificate identifier in your prompt.
Example prompts:
- Regenerate certificate app.cert01.test.com.
Provide one of the following identifiers:- resourceId the AppViewX resource ID. Preferred identifier.
- commonName + serialNumber the certificate common name combined with its serial number.
-
Review the regeneration confirmation returned by the AI
assistant.
The AI assistant confirms the regeneration has been triggered and displays:
- Certificate common name
- HTTP status: 202 Accepted
- Request ID (
requestId) - New resource ID (
newResourceId) the ID of the newly generated certificate in AppViewX
Check Workflow Request Status
get-cert-workorder-statusChecks the current step-by-step workflow status of any pending request. The response includes each workflow step with its current status: Success, In Progress, or Failed. Use the request ID returned by the Renew, Revoke, or Regenerate tools.
-
Ask the AI assistant to check the status of a pending request by
providing the request ID.
Example prompts:
- Check the status of request 60.
-
Review the step-by-step workflow status returned by the AI
assistant.
Note: A single query can invoke multiple tools in combination. For example, a request like "renew all server certificates expiring in the next 30 days" would use the fetch-list tool (to identify matching certificates) followed by the renew tool (to renew each one), and so on for similar multi-step queries.
More Things You Can Ask
- Show me all certificates issued by DigiCert.
- Find RSA 2048 certificates expiring this quarter.
- Show me all DigiCert managed server certificates expiring in 30 days.
- Renew all expiring server certificates issued by GlobalSign expiring in next 30 days.
- Show me all the expired certificates from microsoft enterprise CA, which are in monitored status.
- Revoke all certificates with common name "old.appviewx.com" and organizational unit "Old OU".
- Find all certificates in organization unit "Expired OU" expiring in the next 7 days and renew them.
Troubleshooting
Remote Mode
Cause: The AI client initiated the MCP connection but did not open a browser window to start the OAuth login flow. This is typically caused by a configuration error or a client that does not support browser-based OAuth for MCP HTTP connections.
Resolution:
- Verify that the MCP Server URL in your client configuration is
correct:
https://mcp.appvx.com/mcp. - Confirm that your AI client supports OAuth-based MCP HTTP connections. Update to the latest available version of your client.
- Check that your browser is set as the system default browser and is not blocked by a firewall or security policy.
- Fully restart the AI client and try again.
Cause: The MCP Server cannot establish a connection if the user's AppViewX account requires action before a valid OAuth token can be issued. This applies to two scenarios: a forgotten password where the reset flow interrupts the OAuth handshake, or a first-time login where AppViewX forces a mandatory password change before access is granted. In both cases, the MCP Server receives no valid token and the connection fails.
- Before initiating any MCP connection, open your AppViewX tenant
URL directly in a browser and confirm you can log in
successfully.
- Forgot password: Use the Forgot Password link on the login page, complete the password reset flow entirely in the browser, and confirm you can log in with the new password before returning to the AI client.
- First-time login: Complete the mandatory password change when prompted and confirm you reach the AppViewX dashboard before attempting the MCP connection.
- Once a successful browser login is confirmed, return to your AI client and re-initiate the MCP connection. The OAuth flow will now complete normally and issue a valid token to the MCP Server.
- If the issue persists, navigate to Infinity AI > MCP > MCP Auth Logs in AppViewX and check the authentication event for a specific failure reason.
Cause: Your AppViewX user account does not have an email address configured. The OAuth login flow requires a valid email address. Authentication fails if the field is empty.
Resolution: Log in to your AppViewX instance and add a valid email address to your user account profile. If you do not have permission to edit your own profile, contact your AppViewX administrator.
Cause: Authentication completed successfully, but the MCP Server returned zero tools. This occurs when one or more of the following conditions are true:
- Your AppViewX role does not include the MCP Server Access permission.
- Your tenant does not hold a valid license for any of the tool-contributing products (CLM or ADC).
- No scopes were selected during the OAuth consent step, or the scopes selected do not correspond to any licensed product on your tenant.
- The wrong tenant name was entered during the login flow, resolving to an incorrect AppViewX instance.
Resolution:
- Navigate to in AppViewX and confirm that the MCP Server Access permission is enabled for your role. If it is not, contact your administrator.
- Confirm that your tenant holds at least one active product license (CLM or ADC).
- Re-authenticate to trigger a new consent flow. At the consent page,
select at least one scope that corresponds to a licensed product.
For certificate visibility, select
avx:read. - Verify that the tenant name you entered matches your actual AppViewX
tenant subdomain. For example, if your AppViewX instance is
mycompany.appviewx.com, the tenant name is mycompany. - Navigate to and check the authentication event for error details.
Cause: The user's AppViewX role does not include the MCP Server Access permission. Tool discovery fails immediately after login, before any tools are returned. This is distinct from a licensing issue authentication succeeds, but the server rejects the tool discovery request.
Resolution:
- Navigate to in AppViewX.
- Confirm that MCP Server Access is enabled for your role.
- If the permission is missing, contact your AppViewX administrator and request that it be added to your role.
- After the permission is granted, re-authenticate in your AI client to start a new session.
Cause: Your organisation uses an enterprise account for your AI client. Enterprise accounts do not allow individual users to add or remove connectors. The option to add a custom connector may be hidden or disabled.
Resolution: Contact your IT team
or Claude administrator and request that the AppViewX MCP Server
connector (mcp.appvx.com) be added to the
organisation's AI client account. You cannot complete this step yourself
and must wait for the connector to be provisioned before
proceeding.
Cause: The OAuth token is invalid, has expired, or was issued for a different resource or tenant.
Resolution:
- Re-authenticate by removing the
avx-mcp-serverentry from your AI client configuration, saving, re-adding it, and saving again. This triggers a fresh browser login and issues a new token. - Confirm that you entered the correct tenant name during the login flow.
- Navigate to and check whether the authentication event shows a failure reason.
Cause: The OAuth token does not carry the scope required by the tool, or the user's AppViewX role does not include the MCP Server Access permission.
Resolution:
- Confirm that you granted the required scope during the OAuth consent
step:
- Certificate and ADC read tools require
avx:read. - Certificate lifecycle tools
(
certificate-renew,certificate-regenerate,certificate-revoke) requireavx:certificate:write. - The workflow status tool requires
avx:workflow:execute.
- Certificate and ADC read tools require
- If the required scope was not granted, re-authenticate to trigger a new consent flow and select the correct scopes.
- Navigate to and confirm that MCP Server Access is enabled for your role.
- Each user can make up to 15 requests per minute.
- Each tenant can make up to 50 requests per minute across all its users.
- Wait for the rate limit window to reset before retrying.
- If you consistently encounter this error during normal usage, contact your AppViewX administrator to review the per-user and per-tenant rate limit thresholds configured for your tenant.
Cause: The AI client is not communicating with the AppViewX MCP Server. This is typically caused by a network connectivity issue, an incorrect server URL, or a stale client connection.
Resolution:
- Confirm the AppViewX MCP Server URL is reachable from your machine:
curl -I https://mcp.appvx.com/mcp
A successful response confirms network connectivity. A connection timeout or refused error indicates a network or firewall issue. - Verify the
urlvalue in your AI client configuration file exactly matches the URL provided by your AppViewX administrator. - Check the configuration file for JSON syntax errors. Paste the content into a JSON validator if unsure.
- Fully restart the AI client to force a fresh connection.
