
Migrating from MS ADCS to AVX Native CA
Network Prerequisite: Communication
| Port | Protocol | Direction | From | To | Purpose |
|---|---|---|---|---|---|
| 135 | TCP | Inbound/ Outbound | Autoenrollment Server Machine | All Windows machines in the domain | RPC Endpoint Mapper |
| 49152–65535 | TCP | Inbound/ Outbound | Autoenrollment Server Machine | All Windows machines in the domain | RPC Dynamic Ports |
| 30020 / 31443 / Custom LB Port | TCP | Outbound | Autoenrollment Server Machine | CC / AppViewX / Load Balancer | Communication with AppViewX |
| 3268 / Custom Global Catalog Port | TCP | Inbound | CC / AppViewX | Active Directory (AD) | Fetch SAN / Certificate details |
Migration Overview
To start the migration,
-
Go to Menu > PKI > CA Migration.
The Migration Overview page is displayed.
-
Select MSCA (ADCS).
Note: This option is currently enabled only for migration of MSCA (ADCS). The AppViewX Standard CA and EJBCA options are disabled.
-
Click Start Migration.
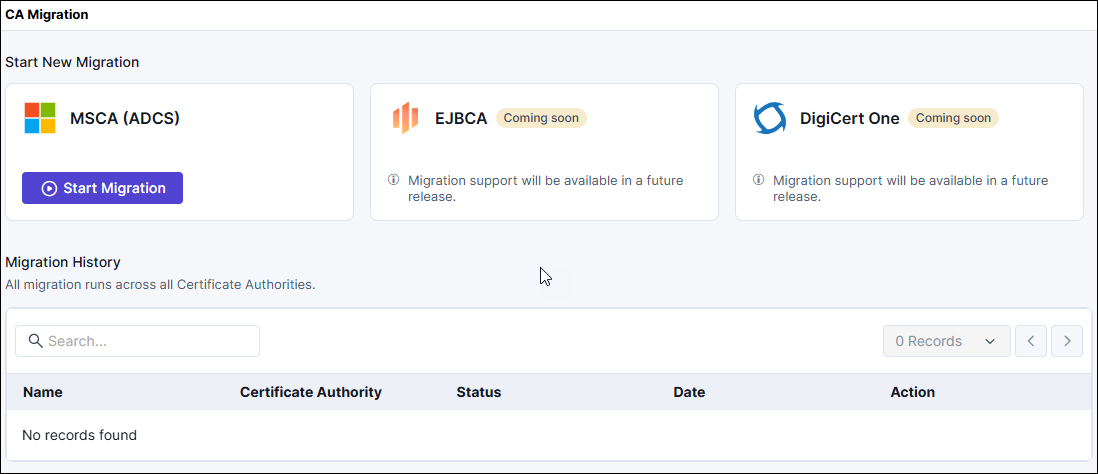
Migration History
- Resume: Continue the migration from where it was paused or interrupted. Selecting Resume opens the wizard at the last saved step.
- Discard: Permanently cancel the migration. When you select Discard, AppViewX displays a confirmation message. If confirmed, AppViewX removes all resources created during that migration run (such as PKI templates, certificate groups, and WAEP agent configurations). Pending migration steps are marked as Discarded.
| Column | Description |
|---|---|
| Migration Name | The unique identifier assigned to the migration run. |
| Certificate Authority | The name of the source Microsoft Certificate Authority (MSCA). |
| Status | The current or final state of the migration:
|
| Date | The timestamp when the migration was last updated or completed. |
| Action | Options to interact with the migration record.
Select View Details to
open the Migration Summary
pane. The pane shows a quick overview of the
migration run, including: Click a step entry to expand a dropdown displaying
detailed information for that step.
Note: The View Full
Report option is not available for
migrations with a Discarded status.
|
- Migration Status: Displays the overall status (Completed, Partially Completed, or Discarded).
- CAs Migrated: The total count of source root and subordinate CAs mapped to AppViewX PKI CAs.
- Templates Created: The number of equivalent AppViewX PKI certificate templates generated.
- Step Progress: A summary count of completed, skipped, and discarded steps in the migration journey.
- Execution Summary: Operational summary and log notes for the migration run.
- Step Details: Select any individual step to expand its dropdown and inspect detailed step-level execution details.
View full migration report
- Source and Destination CA Details: Displays the source MSCA hierarchy, target AppViewX Native CAs, and CA mapping associations.
- Template Mappings: Lists discovered ADCS templates, target AppViewX templates, and template creation statuses.
- Issuer and Group Mappings: Details mapped CA issuers, certificate groups, and assigned permissions.
- WAEP Configuration: Shows Windows Auto-Enrollment Protocol endpoint details, FQDN or IP addresses, and configured port numbers.
- LDAP Configuration: Displays Active Directory and Global Catalog settings (with sensitive credentials and secrets masked).
- Enrollment Server Details: Shows enrollment server host information, registration parameters, and backend script execution logs.
Select Migration Type
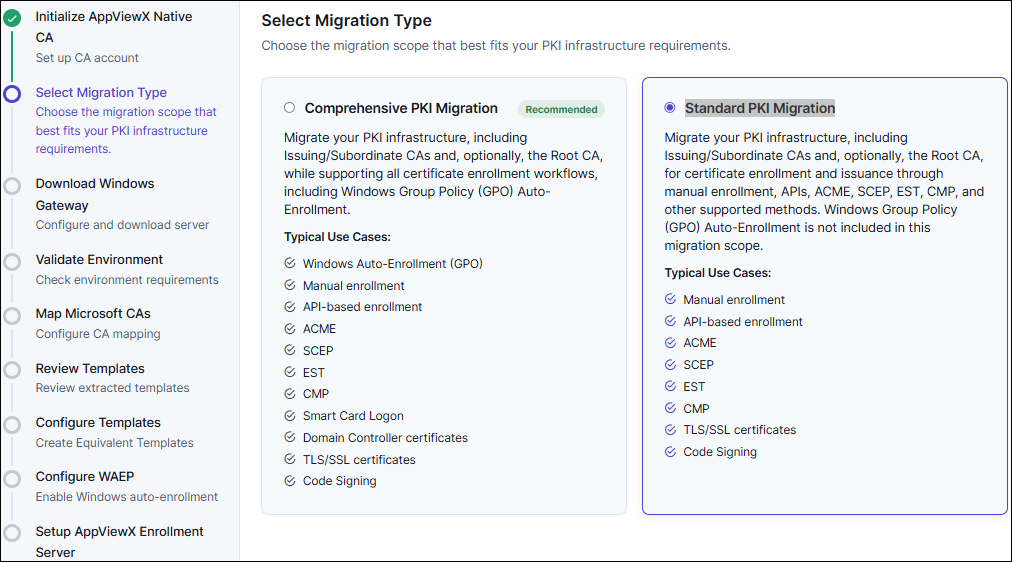
- Comprehensive PKI Migration: An end-to-end migration path that clones Active Directory templates, validates enterprise-level permissions, and sets up automated certificate enrollment (WAEP and Enrollment Server).
- Standard PKI Migration: A lightweight, read-only migration path that discovers and maps existing templates into AppViewX without modifying Active Directory or deploying enrollment agents.
Migration workflows
- Comprehensive PKI Migration workflow (8 steps):
- Select Comprehensive PKI Migration and click Continue.
- Download and deploy the Windows Gateway.
- Validate domain and enterprise administrative permissions.
- Map the source Microsoft CA to AppViewX Native PKI.
- Review the discovered templates.
- Configure and clone templates in Active Directory with the
AVX_prefix. - Configure Windows Auto-Enrollment Proxy (WAEP) settings.
- Download, install, and configure the AppViewX Enrollment Server.
- Standard PKI Migration workflow (6 steps):
- Select Standard PKI Migration and click Continue.
- Download and deploy the Windows Gateway.
- Validate network connectivity (admin permission checks are skipped).
- Map the source Microsoft CA to AppViewX Native PKI.
- Review the discovered templates in read-only mode.
- Map the discovered templates to AppViewX templates and click Finish.
Download Windows Gateway
Steps:
- Click Download Gateway to download the windows gateway package to the local machine. (Download and install the package before validating the connection.)
-
Enter the fields as follows:
Fields Description Gateway Setup Migration Name Enter a user-friendly name (maximum16-characters) to identify the migration. This name will be used in the WAEP agent configuration and template creating within AppViewX. : Note:- The migration name specified here will be used as a suffix when creating the AppViewX equivalent Template
- The new WAEP agent settings will also be created with the same migration name.
Server Configuration *Select Data Center Select the desired data centre to establish the connection. *Hostname Enter the hostname or FQDN where the Windows Gateway will be installed. Provide a fully qualified domain name only. *Port Enter the port number from which the Windows Gateway service listens. Default port is 8999, but a custom port can be provided if needed. Authentication Credentials *Authentication Select the authentication type to access the windows gateway machine: - Manual
- Credential List - Appviewx
*Username This field is enabled when the Authentication = Manual. Enter the username of the Windows Gateway machine.
*Password This field is enabled when the Authentication = Manual. Enter the password of the Windows Gateway machine.
*Credential List This field is enabled when the Authentication = Credential List Select the desired preconfigured credential list from the available options.
Certificate Configuration Client Authentication Certificate Upload the client authentication certificate that is used to authenticate with the Windows Gateway endpoint. Click Upload to select the certificate. Only .p12 or .pfx certificates are allowed.
You will be prompted to Enter Password for the certificate in the Authentication Details popup.
Note: (Optional) Click Remove Certificates to change the uploaded certificate. This option is displayed above the Save Configuration button only after the certificate is uploaded.*: Mandatory fields -
Click Update and Validate.
A connection Succeded message is displayed if the Windows Gateway is found to be up and running. Then Continue button is enabled.AppViewX validates both the network connection to the Windows Gateway service and the provided credentials.
- Success: If both checks pass, a confirmation message appears, the status changes to Valid, and Continue is enabled.
- Connectivity Failure: If the gateway is unreachable, an error message indicates that the service cannot be reached and credential validation could not run.
- Credential Failure: If the gateway is reachable but the credentials fail, an error message displays the specific authentication failure (such as an incorrect username or password).
-
Click Continue.
The Validate Environment screen is displayed.
Validate Environment
(A) Active Directory / MSCA Side
The system verifies that the user running the utility has the required permissions to:
- Fetch Active Directory details (name or IP address)
- Confirm that the logged-in user has Enterprise Admin privileges and Domain Admin privileges
- Validate connectivity from the Windows Gateway to Active Directory over ports 88 and 389
- Verify membership in Domain Admins security group for domain-level management operations.
- Verify membership in Enterprise Admins security group for forest-level Certificate Authority operations.
(B) AppViewX PKI Side
The system verifies that the migration utility has:
- Permission to create new templates
- Permission to read and validate CA configurations
If any required permission is missing, the system blocks the migration and displays clear, actionable error messages indicating the missing permission and the steps to resolve it (e.g., updating AD group membership or assigning roles in AppViewX).
The system allows migration to proceed only after successful validation.
The following validation checks are displayed in the UI with status either as Granted or Failed.
Environment validation
- Retrieve domain name, domain controller, and network details from Active Directory
- Verify network connectivity to domain controller on port 88 (Kerberos) and port 389 (LDAP)
- Verify membership in Domain Admins security group for domain-level management operations
- Verify membership in Enterprise Admins security group for forest-level Certificate Authority operations
AppViewX Validation
- Create, modify, and manage Certificate Authorities in PKI-as-a-Service
- Download AppViewX Enrollment Server
- Create and manage service accounts for automation and integration
- Create and manage PKI certificate templates for automated enrolment
- Configure LDAP and Active Directory authentication settings
- Configure and manage Windows Auto-Enrollment Protocol agent settings
- View and access cloud connector configurations (only for SaaS – Cloud Connector)
Steps:
Map Auto-enrollment CAs
- Choose the Migration Strategy
- Perform the CA Selection
- Map and Migrate CAs
Migration Strategy
- Option 1 - Migrate Root CA to AppViewX - Full CA hierarchy
migration. The selected Root CA and the subordinate CA are recreated in
the AppViewX PKI.
- Recreates the Root CA in AppViewX PKI.
- Migrates all Subordinate CAs together.
- Selectively migrates Subordinate CAs; the system does not migrate unselected CAs.
- Option 2 - Keep Root CA in ADCS and Migrate Subordinate CAs -
Migrate only selected Subordinate CAs.
- Root CA remains in Microsoft.
- Migrates all selected Subordinate CAs together.
- AppViewX PKI acts as the Issuing CA only.
Steps:
CA Selection
- CA Discovery
- Automatically initiates CA discovery after selecting a migration strategy.
- Discovers all Root CAs in the current AD domain and forest.
- Discovers all Subordinate CAs under each Root CA.
Steps:
-
If you selected Migrate Root CA to AppViewX in the CA Selection
screen, then select the appropriate Root CA and Subordinate CAs.
OR
If you selected Migrate Root CA to AppViewX in the CA Selection screen, then select the Subordinate CAs.
-
Click Continue.
The Map and Migrate page is displayed.
Map and Migrate
- Existing AppViewX PKI CAs of the appropriate type (Root or Subordinate), or
- An option to Create New PKI CA if no suitable CA exists.
Selecting Create New PKI CA redirects the user to the Create AppViewX PKI CA page and, once completed, returns the user to the mapping flow with the newly created CA available for selection.
For existing ADCS Root and Sub CAs, only AppViewX PKI Root CAs and AppViewX PKI Subordinate CAs are shown respectively. When migrating Root and Subordinate CAs together the hierarchical awareness is maintained on the UI—Once Root CA is mapped, existing Sub CAs under that AppViewX Root are shown preferentially. Subordinate CA mapping respects the selected Root CA hierarchy.
Steps:
- Select the appropriate AppViewX PKI Root CA and Subordinate CA from the dropdown on the right side of the page for the corresponding Microsoft CAs on the left.
-
(Optional) If there are no AppViewX PKI CAs displayed in the
dropdown, then click Create New PKI CAand add the CA
details.
Note: After creating the CA, go back to the Map & Migrate page and click the ‘Refresh’ icon next to the dropdown field to display the newly created CA in it.
-
Click Continue.
The Review Template page is displayed.
Review Templates
| Field | Description |
|---|---|
| Name | The Microsoft template name prefixed with
AVX_PKI. |
| OID | The Object Identifier assigned to the template in Active Directory. |
| Validity Period | The certificate validity duration configured on the template. |
| Renewal Period | The certificate renewal window configured on the template. |
| Key Length | The key length and cryptographic algorithm supported by the certificate template. |
| EKU | The Extended Key Usage extension identifiers and purposes. |
- Search: Enter a template name in the Search by template name box to filter the table in real time.
- Pagination: The table displays up to 25 records per page.
- Persistent selection: Template selections persist across pagination and search filters.
To review and select templates:
-
In the Review Templates table, find the templates you want to
migrate:
- To filter the list, enter the template name in the Search by template name box.
- To browse more templates, use the pagination controls.
- Select the checkbox next to each template you want to migrate. You can select one or more templates across multiple pages.
-
(Optional) To create a duplicate copy of a discovered template
within Active Directory before migration, select Copy Template.
Important: You can copy only templates that are actively associated with the selected CA.
-
Click Continue.
The Configure Template page is displayed.
Configure Templates
After selecting templates, configure equivalent AppViewX PKI templates and map them to their corresponding certificate groups and issuers. The created equivalent templates retain all source Active Directory configuration context for downstream auto-enrollment workflows.
The following table describes the fields and controls on the template mapping page:
| Column / Element | Description |
|---|---|
| MS Template | The source Microsoft Active Directory Certificate Services (ADCS) template name. |
| AppViewX Template | The generated AppViewX equivalent template name, suffixed with the migration name. |
| Issuer Name | The Certificate Authority (CA) issuer mapped to the template. |
| Certificate Group | The certificate group assigned to the template. |
| Search | Enter a template name or attribute to dynamically filter the table. |
| Pagination | Displays up to 25 records per page. Use the pagination controls at the bottom of the table to browse multiple pages. |
- On the Map AD published templates with AVX templates page, select Create Certificate Group.
- In the Create Certificate Group dialog box, enter the group name and select Save.
-
Select Create All Equivalents.
The table displays the generated templates with their default mappings.
-
Locate and review the generated templates:
- Search: In the Search box, enter a template name or attribute to filter the list.
- Pagination: If the migration contains more than 25 templates, use the pagination controls at the bottom of the table to navigate between pages.
- Optional:
To modify an individual template:
- In the Action column, select the Edit icon next to the template.
- In the Modify Template pane, update the Certificate Group, Issuer Name, or AppViewX Template name.
- Select Save Changes.
- Optional:
To update multiple templates simultaneously (bulk edit):
- Select the check boxes next to the target templates across any page.
- Select Bulk Edit.
- In the Bulk Edit pane, select the new Issuer Name from the drop-down list.
- Select Apply.
- Optional:
To remove an equivalent template:
- In the Action column, select the Delete icon next to the template.
- In the confirmation dialog box, select Confirm.
Note: Deleting an equivalent template removes it permanently from the current migration mapping. Deleted templates cannot be recreated or re-mapped within the same migration journey; you must initiate a new migration to include them again -
Select Continue to proceed to the WAEP configuration
step.
Important: Template configuration changes are saved only after you select Continue. If you leave the page before continuing, your changes are lost.
Configure WAEP
-
In the Configure WAEP screen, enter the details as follows:
Fields Description Endpoint Details *Name The name field is read only and auto-populated by default with the Migration name set in the Download Windows Gateway stage. *IP/FQDN The dropdown list field contains a list of FQDN's from the stored data. Users can choose from the available values. The hostname format is <tenant>-aep.<domainname>. For Onprem the list is populated with the On-Prem node details. Select any one of the values.
For SaaS the list is populated with the hostname of the Cloud Connector and AEP Gateway details.- Using On-premises CC
- Without load balancer:It is the hostname of the cloud connector where the auto-enrollment gateway is running.
- With load balancer: Manually enter the hostname of the cloud connector.
- Using Direct Gateway: In the SaaS setup, to use the direct AEP gateway without installing the cloud connector, the FQDN/IP address will be the tenant URL with "-aep" before the domain name.
*Port The port number is auto-populated based on the selected IP/FQDN value. If the IP/FQDN value is entered manually, then enter the appropriate port number.- HTTPS URL (always)
- Onprem - 31443
- SAAS - 30020
*Datacenter Select the data center. The value is auto-populated based on the cloud connector. Global Catalog Configuration *LDAP URL List of LDAP/LDAPS configurations fetched from Platform. Configure LDAP Page A link below the LDAP URL field that redirects to Platform page to add the LDAP/LDAPS configurations. Refer to the section Configuring LDAP for WAEP for more details.
Sync Fetches latest LDAP configuration data from Platform. *LDAP Base DN This field is displayed after selecting value in the LDAP URL field. If AD sync is enabled, the LDAP base DN is auto-populated based on the IP address of the global catalog server selected from the LDAP URL dropdown list.
*: Mandatory fields - Using On-premises CC
-
Click Create WAEP agent.
The new WEAP agent setting will be configured in the Auto-Enrollment: Windows AEP page (Go to Menu > CLM > Administration > Auto Enrollment > WAEP).
The Setup Enrollment Server screen is displayed.
Setup Enrollment Server
After successful WAEP configuration and validation, the system progresses to the Enrollment Server setup stage.
- System Actions:
- Displays the generated WAEP URL.
- Provides option to download the AppViewX Enrollment Server package (with embedded WAEP URL).
- During Download:
- Creates a backend service account for installation and ongoing communication.
- Post Download:
- Displays setup instructions including:
- Hostname, port, and agent details
- Service account Client ID and Secret (to be added in the configuration file)
- Once downloaded, refer Installing AppViewX Enrollment Server and perform the listed steps.
- Prompts the user to start the service after completing setup.
- Displays setup instructions including:
- User Action:
- Provides confirmation to execute a system-initiated configuration script
- Follow the steps mentioned in Configuring Permissions for AppViewX to provide permissions for the auto enrolment server.
- System Actions (Script Execution):
- Registers CA as an Enrollment Service in Active Directory
- Adds selected certificate templates to the CA
- Publishes Root and Intermediate certificates as trusted certificates in the domain
- Completion
- System triggers script execution remotely on the target host
- Validates each step for successful completion
- On success, allows the user to proceed to the next validation stage
Steps:
- In the Setup Enrollment Server page, the first stage ——Download & prepare, the WAEP URL field is displayed and is read-only. Copy and save and URL for future reference.
-
Click Download & prepare button.
The AppViewX enrolment server zip file is downloaded successfully.
-
Follow the installation instruction specified on the screen. Use the
AppViewX enrolment server, client details and secret to complete the
installation and start the service.
Note:
- The AppViewX enrolment server must be installed in the same machine where the Windows gateway was installed at the start of the migration journey.
- After the dwnload is complete, refer to the section Installing AppView Enrollment Server to perform the installation.
-
Click Continue.
The Setup Enrollment Server page, second stage ——Install and run page is displayed with the set of instructions.
- Follow the steps mentioned in the Instructions to provide permissions for the Auto enrolment server. Additionally, refer to the section Configuring Permissions for AppViewX.
-
Click the I approve AppViewX to install on the machine
checkbox.
The Run setup button is enabled.
-
Click Run setup.
The following script executions are performed at the backend:
- Registering CA as an Enrollment Service in Active Directory
- Adding selected certificate templates to the CA
- Publishing Root and Intermediate certificates as trusted certificates in the domain
- Click Finish.
- How to verify migrated templates in Menu > PKI > Certificate Templates.
- How to manually initiate certificate enrollment from the AppViewX GUI when WAEP is deferred.
