Setting up the AppViewX Cloud Connector by Quick Installation using CLI
If the host machine does not/cannot fulfill the installation prerequisites, you can set up the AppViewX Cloud Connector via the AppViewX SaaS OVA. To know more about the OVA and for instructions on setting up the AppViewX Cloud Connector using the AppViewX SaaS OVA, click here.
curl command.-
Configure the native OS for the cloud connector installation.
Note: Before executing the following instructions, ensure that you have root user permissions.
-
Create the appviewx user and directory.
useradd appviewx && mkdir /home/appviewx/ && chown appviewx:appviewx /home/appviewx && chmod 700 /home/appviewx -
Uninstall the previous version of Docker.
- For RHEL, CentOS, and Amazon Linux
2:
sudo yum remove docker \ docker-client \ docker-client-latest \ docker-common \ docker-latest \ docker-latest-logrotate \ docker-logrotate \ Docker-engine - For
Ubuntu
for pkg in docker.io docker-doc docker-compose podman-docker containerd runc; do sudo apt-get remove $pkg; done
- For RHEL, CentOS, and Amazon Linux
2:
-
Configure the hostname and the nameserver.
- Configure the hostname:
sudo hostnamectl set-hostname "hostname" - Add the host IP address at the end of the hosts
file.
sudo vi /etc/hosts <ip> <hostname> - Replace the default nameserver IP
address.
sudo systemctl stop systemd-resolved.service sudo systemctl disable systemd-resolved.service sudo rm /etc/resolv.conf sudo vi /etc/hosts/ <ip> <hostname> - To configure nameserver, add the IP address of the nameserver to
beginning of the
resolv.conf
sudo vi /etc/resolv.conf nameserver <nameserver ip>
- Configure the hostname:
-
Add Docker repo and install Docker.
- For RHEL and
CentOS
sudo yum install -y yum-utils && sudo yum-config-manager --add-repo https://download.docker.com/linux/centos/docker-ce.repo sudo yum install -y docker-ce docker-ce-cli containerd.io sudo systemctl start docker sudo systemctl enable docker sudo systemctl status docker - For Amazon Linux
2
sudo yum install -y docker containerd sudo systemctl start docker sudo systemctl enable docker sudo systemctl status docker - For
Ubuntu
To install Docker for Ubuntusudo apt-get update sudo apt-get install ca-certificates curl gnupg #Add Docker’s official GPG key for Ubuntu: sudo install -m 0755 -d /etc/apt/keyrings curl -fsSL https://download.docker.com/linux/debian/gpg | sudo gpg --dearmor -o /etc/apt/keyrings/docker.gpg sudo chmod a+r /etc/apt/keyrings/docker.gpg #Use the following command to set up the repository: echo \ "deb [arch="$(dpkg --print-architecture)" signed-by=/etc/apt/keyrings/docker.gpg] https://download.docker.com/linux/ubuntu \ "$(. /etc/os-release && echo "$VERSION_CODENAME")" stable" | \ sudo tee /etc/apt/sources.list.d/docker.list > /dev/null sudo apt-get updatesudo apt-get update && sudo apt-get install docker-ce docker-ce-cli containerd.io docker-buildx-plugin docker-compose-plugin sudo systemctl start docker sudo systemctl enable docker sudo systemctl status docker
- For RHEL and
CentOS
-
Add the appviewx user in the Docker group.
sudo groupadd docker sudo usermod -aG docker appviewx -
Install NTP.
- For RHEL and
CentOS
sudo yum update -y sudo yum install ntp -y sudo systemctl restart ntpd sudo systemctl enable ntpd ntpq -np - For Amazon Linux
2
sudo yum install -y chrony sudo systemctl enable chronyd sudo systemctl start chronyd sudo systemctl status chronyd - For
Ubuntu
sudo apt update -y sudo apt install ntp -y sudo systemctl restart ntp sudo systemctl enable ntp ntpq -np
- For RHEL and
CentOS
-
Install the additional packages required for the AppViewX Cloud
Connector to run.
- For RHEL, CentOS, and Amazon Linux
2
sudo yum install bind-utils net-tools telnet tcpdump curl -y - For
Ubuntu
sudo apt install bind9-utils net-tools telnet tcpdump curl -y
- For RHEL, CentOS, and Amazon Linux
2
-
Limit the maximum number of processes that the appviewx user can
create.
sudo vi /etc/security/limit.conf appviewx soft nproc 65536 appviewx hard nproc 65536 appviewx soft nofile 65536 appviewx hard nofile 65536 -
Allow the appviewx user to run sudo root.
sudo vi /etc/sudoers appviewx ALL=(ALL) ALL -
To download the required packages, enable the AppViewX
repository.
Important: This step is not applicable for Amazon Linux 2.
-
If access to the internet is restricted, whitelist the AppViewX
repository to perform OS patching.
- For RHEL and
CentOS
mv /etc/yum.repos.d /etc/yum.repos.d_backup mkdir -p /etc/yum.repos.d mv appviewx.repo /etc/yum.repos.d/appviewx.repo yum clean all yum update - For Ubuntu
- Create a file, appviewx_repo.list, and open it
for
editing.
vi /etc/apt/sources.list.d/appviewx_repo.list - Add the following to the appviewx_repo.list
file:
#appviewx apt repo deb https://repos.appviewx.com/repository/ubuntu focal universe deb https://repos.appviewx.com/repository/ubuntu focal-updates universe deb https://repos.appviewx.com/repository/ubuntu focal multiverse deb https://repos.appviewx.com/repository/ubuntu focal-updates multiverse deb https://repos.appviewx.com/repository/ubuntu focal-backports main restricted universe multiverse deb https://repos.appviewx.com/repository/ubuntu focal-security main restricted deb https://repos.appviewx.com/repository/ubuntu focal-security universe deb https://repos.appviewx.com/repository/ubuntu focal-security multiverse - Create a file, auth.conf and open it for
editing.
vi /etc/apt/auth.conf - Add the following to the auth.conf
file:
machine repos.appviewx.com login xxxxx password xxxxxNote: Contact the AppViewX TAC/CSM team for the login and password.
- Create a file, appviewx_repo.list, and open it
for
editing.
- For RHEL and
CentOS
- Create a new directory at the location /home/appviewx and name it cc-installer.
- Ensure that the AppViewX Cloud Connector can establish connectivity with the AppViewX SaaS server endpoints over HTTPS (port 443).
-
To verify connectivity with the AppViewX SaaS servers, use the cURL
utility.
curl -k --max-time 20 --connect-timeout 20 -s -o /dev/null -w "%{http_code}" "<<https://AppViewX SaaS server URL>>/socket.io/?EIO=3&transport=polling&t=O11wka_"If connectivity has been established successfully, the command will return the HTTP code 200. If the command returns any other code, it indicates that connectivity is not established.
-
Create the appviewx user and directory.
-
Access the AppViewX user interface.
In order to set up the AppViewX Cloud Connector instance, you will need to login to the connectivity service’s user interface. The following steps will outline the navigation and steps required to access the AppViewX Cloud Connector's setup interface.
As an additional layer of security, AppViewX issues client certificates to access the AppViewX GUI. The client certificate will be made available as part of the onboarding process. Upload this client certificate to the browser to start accessing the product.
-
Enter your account URL (for example,
https://tenant-name.appvx.com/appviewx/login) in the address bar of your
browser.
The AppViewX login page is displayed.
- Login to AppViewX.
-
Navigate to the cloud connector's setup interface.
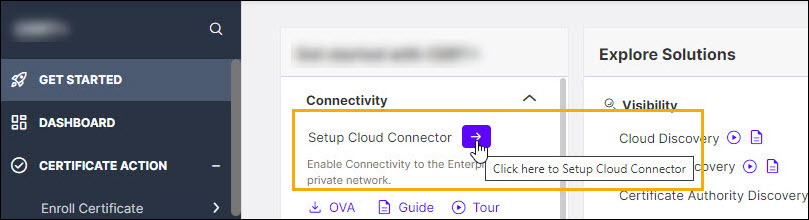
There are three ways you can access the interface for setting up the AppViewX Cloud Connector:
- From the product landing page (that you will see as soon as you
have logged in)
- Expand the Connectivity section and click

.
You will be redirected to the Settings :: Cloud
Connector page.
- Expand the Connectivity section and click
- From the new navigation menu (displayed by default starting
product version 2022.1.0 FP3 onwards):
- From the menu in the top-right corner of the page,
select Platform.
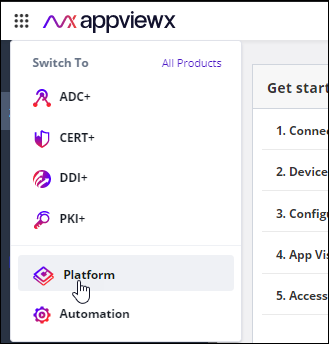
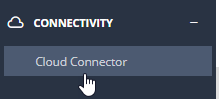
- From the Platform menu, under
Connectivity, click Cloud Connector.The Settings :: Cloud Connector page is displayed.
- From the menu in the top-right corner of the page,
select Platform.
- From the old navigation menu: Note: For instructions on switching between the new and the old navigation menus, click here.
- From the top right corner of the landing page, click the menu icon.
- From the menu displayed, navigate to Settings >
Cloud Connector.
The Settings :: Cloud Connector page is displayed.
- From the product landing page (that you will see as soon as you
have logged in)
-
Enter your account URL (for example,
https://tenant-name.appvx.com/appviewx/login) in the address bar of your
browser.
-
Install the AppViewX Cloud Connector using the automated script.
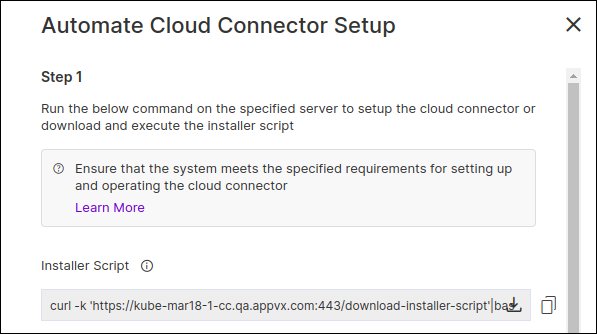
To install the AppViewX Cloud Connector using the automated installation script, from the cloud connector details banner, you can either download the installer script or copy the
curlcommand.-
From the cloud connector details banner, click Download Installer
Script.
OR
Copy the
curlcommand to run the installer script.
-
On the host machine:
If you have downloaded the installer script, execute the following commands:
ORchmod +x installer.sh ./installer.shIf you have copied the
curlcommand, to execute the command, paste the command on the command line terminal and press Enter.Non-Interactive Installation (for CI/CD and automation):
To install the Cloud Connector without interactive prompts — for example, in CI/CD pipelines or infrastructure automation tools — pass all required parameters as command-line arguments using the
--non-interactiveflag:chmod +x installer.sh ./installer.sh --non-interactive \ --master-key <master_key> \ --datacenter <datacenter_name> \ --rsocket-url <rsocket_url> \ --tenant-id <tenant_id>Table 1. Non-Interactive Installation Arguments Argument Description --master-keyThe Master Key for authenticating against the target AppViewX tenant. Copy this from Menu > Platform > Cloud Connector > Automated Cloud Connector Setup > Step 2. --datacenterThe name of the data center on which this Cloud Connector will be deployed and registered. --rsocket-urlThe RSocket URL of the AppViewX SaaS server. --tenant-idThe unique identifier of the AppViewX tenant. Important: Do not include sensitive argument values (such as the Master Key) in shell history or shared logs. Use environment variables or a secrets manager to supply these values in automated pipelines.Internet connectivity on the host machine is validated. The installation proceeds only if the host machine has internet access. In non-interactive mode, the script validates the Master Key and Datacenter against the target tenant, downloads the Cloud Connector artifacts, installs the Cloud Connector, and registers it with AppViewX automatically. Installation and registration results are written to the log for audit and troubleshooting purposes.Note: For instructions on proceeding with the installation despite not having internet access, click here. -
When prompted to Please provide the master key, enter the
required details.
To retrieve the master key:
- Go to
(Menu) > Platform > Connectivity >
Cloud Connector.The Settings :: Cloud Connector inventory page is displayed.
- From the cloud connector details banner, under Automate Cloud Connector Setup, click Steps to Automate Setup.
- From the Automated Cloud Connector Setup window, under
Step 2, copy the Master Key.
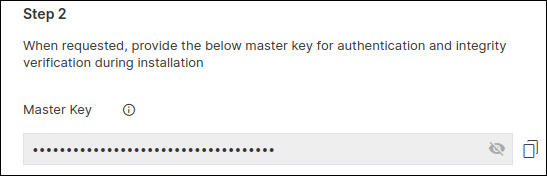
- Paste the master key in the terminal window and press
Enter.
The cloud connector installation script will check for the prerequisites and trigger the cloud connector installation.
When the cloud connector instance is successfully installed, a corresponding entry will be listed in the cloud connector inventory.
- Go to
- When prompted, Please enter Datacenter, enter the name of the data center on which this cloud connector will be deployed.
-
Note: Enabling auto-enrollment protocols is recommended only if the cloud connector is being installed in a demilitarized zone (DMZ) or devices in a restricted environment (that disables them from connecting to the <tenant>-aep directly.When prompted to enable auto-enrollment protocols, enter y and enter the protocol name(s) you want to enable. For instructions on enabling auto-enrollment protocols, click here.Note: By default, only the AppViewX certificate is enabled for auto-enrollment. To enable custom certificate for auto-enrollment:
- Execute the command
./avxctl upgrade gateway-cert. - When prompted, enter the location of the custom certificate.
On successful completion of the setup, a corresponding instance of this cloud connector is displayed in the inventory.Note: The cloud connector installation on a OVA-based host machine will not prompt you to select if you want to manage F5 Big-IP devices. However, after the cloud connector has been installed you can copy the iControl jar in the deps/external_libs folder (click here for instructions) and restart the starter and platform pods (click here for instructions), to enable this feature.Note: Optional, required only for password authentication) In order to successfully execute the installation, AppViewX needs to run a script for which authentication via the .pem file needs to be bypassed. To do this, execute the following commands:sudo sed -i 's/.*PasswordAuthentication.*/PasswordAuthentication yes/g' /etc/ssh/sshd_config sudo systemctl restart sshd - Execute the command
-
From the cloud connector details banner, click Download Installer
Script.
-
To approve the cloud connector installation:
-
Go to
(Menu) > Platform >
Connectivity > Cloud Connector.
The Settings :: Cloud Connector inventory page is displayed. - For the cloud connector instance installed, from the Actions column, click Approve.
-
Go to