Launch F5 Standalone Multi NIC in Azure
This workflow launches a Standalone Multi NIC F5 BIG-IP Virtual Machine on Azure. An F5 device will be deployed in Azure. If a new-stack template is selected, then vnets and subnets will be created. If an existing-stack template is selected, the existing vnet and subnet will be utilized. AppViewX checks if the deployment successfully completed. Once completed, the device details are fetched. The F5 device is added into AppViewX and Email will be sent to the user. Also, option to do basic provisioning to the newly added F5 device.
To run this workflow:
- Go to Menu > ADC+ > AUTOMATION > Workflow Catalog > View/Run
- Click the F5 BIG-IP ZTP category on the View/Run Workflows page.
-
On the popup window, hover the mouse over the Launch F5
Standalone Multi NIC in Azure workflow.
The Run and Schedule buttons are displayed.
-
Click
 .
The Request > Launch F5 Standalone Multi NIC in Azure :: FormBuilder page is displayed.
.
The Request > Launch F5 Standalone Multi NIC in Azure :: FormBuilder page is displayed. -
Enter/select the Azure Account Details.
Note: The entered tenant/application ID must have contributor/owner access to the Azure application provided.
Table 1. Azure Account Details Section - Field and Description Table Field Description Azure Subscription ID Enter the subscription ID. Tenant(Directory) ID Enter Tenant ID. Azure Client ID Enter the client ID. Azure Client Secret Enter the client secret key. -
Enter/select the Proxy Details.
Table 2. Proxy Details Section - Field and Description Table Field Description Connect to Azure via Proxy Allows to connect with Azure via proxy or not. The options are: -
No (default) - select this option to connect with Azure without proxy (Internet connection must be required).
-
Yes - select this option to connect with Azure via proxy, then click the Get Proxies in Appviewx button to fetch the proxy servers configured in AppViewX to be displayed in the Proxies dropdown list.
*Proxy Select a proxy servers configured in AppViewX from the dropdown list. -
-
Enter/select the Azure Deployment information.
Table 3. Azure Deployment information Section - Field and Description Table Field Description Get F5 on Azure Deployment collections Click the Get F5 on Azure Deployment collections button to get the deployment templates from the AppViewX Collection. Select Deployment Collection Select a deployment collection from the dropdown list. Select the Deployment Template Select a deployment template type from the dropdown list. Stack type It is non editable field and stack type will be auto-filled from the selected deployment template. F5 BIG-IP Version It is non editable field and F5 BIG IP version will be auto-filled from the selected deployment template. F5 BIG-IP Virtual Edition It is non editable field and F5 BIG IP virtual edition will be auto-filled from the selected deployment template. nic Add n number of NICs using this template. Content Version It is non-editable field and content version will be auto-filled from the selected deployment template. -
Enter/select the F5 Virtual Machine Details.
Table 4. F5 Virtual Machine Details Section - Field and Description Table Field Description F5 Instance Name Name of the F5 device name which was provided for a device while onboarding it in AppViewX Inventory. Get available resource groups Click this button to fetch the Azure resource groups of virtual network. Virtual Network Resource Group Select a virtual network resource group from the dropdown list. Virtual Network Select a virtual network from the resource group from the dropdown list. Note: Make sure that selected the VNET/Management Subnet has connection established from and to AppViewX, only then the device can be communicated from AppViewX.mgmt subnet name Select a unique management subnet name from the dropdown list. Your subnet must have access to the internet. External subnet name Select an external subnet name. Internal subnet name Select an Internal subnet name. mgmt IP-Address Management IP address to use for the BIG-IP management IP address. By default, this field is filled with DYNAMIC to use a dynamically assigned IP address. Else provide an IP address. Get Available VM Sizes Click this button to fetch the available VM sizes. 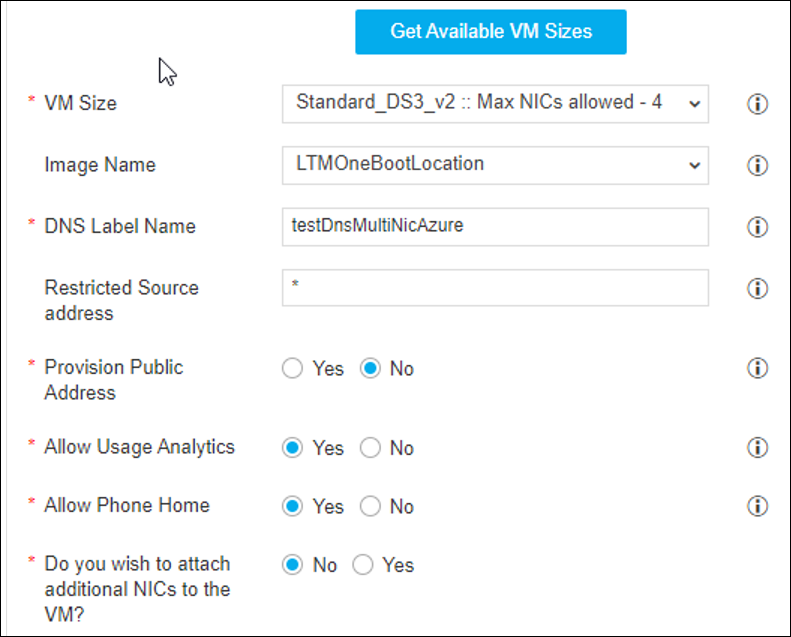
VM Size Select the instance size of the virtual machine from the dropdown list. Boot Location Type The options are displayed in this field as it is available in the Azure marketplace for F5. Select a boot location type based on the requirement. DNS Label Name Enter a unique DNS Name for the Public IP address used to access the Virtual Machine. Restricted Source address This field restricts management access to a specific network or address. Enter an IP address or address range in CIDR notation or asterisk for all sources. Provision Public Address Provision to create the Public IP addresses for BIG-IP Management traffic. These addresses will be configured directly on the Azure network interfaces. Allow Usage Analytics This deployment can send anonymous template statistics to F5 to help us determine how to improve our solutions. If you select No, statistics are not sent. Allow Phone Home This deployment can provide F5 with high-level device use information to optimize development resources. If you select No the information is not sent. Do you wish to attach additional NICs to the VM? Click Yes to attach additional NICs to the VM otherwise select No. -
Enter/select the F5 Login Info.
Table 5. F5 Login Info Section - Field and Description Table Field Description Login User Name Enter the user name for the virtual machine. Note: The user name must not be "admin".Authentication Type Type of authentication to use on the Virtual Machine, password based authentication or key based authentication. Login Password Enter the password with the following combination: Minimum eight characters, at least one uppercase letter, one lowercase letter, one number and one special character.
-
Enter/select the F5 License details.
Table 6. F5 License details Section - Field and Description Table Field Description Do you wish to activate license for the F5 device? The options for activating the license: -
No (default) - if you select this option, you cannot access F5 modules.
-
Yes - if you select this option, the Base registration key is enabled. Enter the registration key to activate the license.
-
-
Click Submit.
The Confirmation dialog box is displayed.
-
To save this form so you can edit it later, click Save Draft and then
click OK.
The form will be saved as Open request under Request > My Request.
OR
To submit the form, click OK.
The validation starts automatically and reaches the Deployment Info stage. In this page, the host details are shown. If required, you can download the details in the .csv or .xls format by clicking the (Download) button.
 -
Click Submit to submit the form.
The validation starts automatically and reaches the VM Status stage.
-
Click Submit to submit the form.
The validation starts automatically and reaches the Basic Provisioning stage.
-
Enter/select the Basic VIP Creation details.
Table 7. Basic VIP Creation Section - Field and Description Table Field Description VIP Name Enter the name of the VIP. Destination Address Enter the destination IP address. Port Enter a port. Pool Name Enter the pool name. Load Balancing Method The load balancing method is used to distribute traffic across pool in this VIP. The default is round-robin. The methods are:-
round-robin - the system selects the pools sequentially.
-
least-connection-node - The system passes a new connection to the node that has the least number of current connections out of all pools of which a node is a member. This method works best in environments where the servers or other equipment you are load balancing have similar capabilities. This is a dynamic load balancing method, distributing connections based on various aspects of real-time server performance analysis, such as the number of current connections per node, or the fastest node response time.
-
least-connection-member - The system passes a new connection to the node that has the least number of current connections in the pool. This method works best in environments where the servers or other equipment you are load balancing have similar capabilities. This is a dynamic load balancing method, distributing connections based on various aspects of real-time server performance analysis, such as the current number of connections per node or the fastest node response time.
-
ratio-member - The number of connections that each machine receives over time is proportionate to a ratio weight you define for each machine within the pool.
-
-
Enter/select the Pool Member Details.
Table 8. Pool Member Details Section - Field and Description Table Field Description Member IP Enter the member IP. Port Enter a port. Pool Members Click the add button to add the pool members to the table. After adding the pool member details to the list, you can manage them. -
Enter/select the Monitor Details.
Table 9. Monitor Details Section - Field and Description Table Field Description Monitor Type Select the health monitors that are available to add for the pool: -
HTTP
-
HTTPS
-
TCP
-
TCPHALFOPEN
-
Gatewaylcmp
Monitor Name Enter the name for the monitor. Send String The text string that the monitor sends to the target object. You must include \r\n at the end of a non-empty Send String. To retrieve a specific page from a website, specify a fully qualified path name. Receive String The regular expression representing the text string that the monitor looks for in the returned resource. The most common receive expressions contain a text string that is included in an HTML file on your site. The text string can be regular text, HTML tags, or image names, and the associated operation is not case-sensitive. -
-
Enter/select the Other Settings.
Table 10. Other Settings Section - Field and Description Table Field Description Banner Name Enter the name for banner. Banner State Select a state for the banner. The possible states are: -
enabled
-
disabled
DNS Address Enter the DNS address. NTP Address Enter the NTP address. -
-
Enter/select the Syslog Setting details.
Table 11. Syslog Setting Section - Field and Description Table Field Description Syslog Name Enter the name for syslog. Syslog Ipddress Enter the syslog IP address. Syslog Port Enter the syslog port. SYSLOG Click the add button to add the syslog settings to the list. After adding the syslog settings to the list, you can manage them. -
Click Submit to submit the form.
The validation starts automatically and reaches the Review stage.
- Review the input data under the implementation, rollback, and postvalidation tabs.
- (Optional) If you need to change any data at this stage, right click and select the required option.
-
After the review, click the Submit button.
The Confirmation popup opens.Note: Click Cancel to stop running the workflow creation.
-
Click Ok to complete the workflow creation.
It takes a while to complete the request.Note: The stages of the request are shown in the left-side of the screen. To view a particular stage of the request, click the respective stage.