Automating Certificates for Firewall Devices in AppViewX
- Prerequisites
- Device Management
- Firewall Inventory
- On-Demand Discovery
- Server Inventory
- Certificate Renewal
- Auto Renew Job.
Prerequisites
Device Management
-
Go to
 (Menu) >
CERT+ > ADMINISTRATION >
Device Management.
By default, the ADC tab opens.
(Menu) >
CERT+ > ADMINISTRATION >
Device Management.
By default, the ADC tab opens. - Click the Firewall tab.
-
Click the
 (Add) icon.
-
Enter the General information, Credentials, Secondary device
information in the device details form.
You can configure multiple device details for the same vendor.
- Click Save.
- Once the server is added successfully you are redirect to the device server inventory. The status of the server can be viewed in the Status column
- A red indicator labelled "License Limit Exceed" appears on the title bar of the page, if the limit has exceeded.
- A pop-up message "Access denied. License count exceeded." is displayed on the click of the Save button while adding a new server device.
- All the new on-boarded server certs (Server/ADC/Firewall/WAF Device config sync) into the inventory will be mapped to theMonitored state.
Firewall Inventory
-
Go to (Menu) >
CERT+ > ADMINISTRATION >
Device Management.
By default, the ADC tab opens.
- Click the Firewall tab.
- In the firewall inventory page, wait for the device status to be Managed.
- Once the device status is moved to Managed, navigate to On-Demand Discovery.
On-Demand Discovery
-
Go to
 (Menu) > CERT+ > CERTIFICATE
DISCOVERY > Discovery Status > On Demand.
The Discovery Status : On-demand page is displayed. .
(Menu) > CERT+ > CERTIFICATE
DISCOVERY > Discovery Status > On Demand.
The Discovery Status : On-demand page is displayed. . -
To create a new on-demand discovery distance:
If this is the first on demand discovery instance, click
 from the center of the
page.
from the center of the
page.OR
Click
 .
. - Enter the Discover Details, Discover By, Discovery Rules, After Discover information in the Discovery Status : On-demand : Add Discovery form.
-
In the Discover Details section, enter/select the following details:
Table 1. Field descriptions for the Discover Details section Field Description *Discovery Run Type Select On-demand. Discovery Instance Name Enter the name of the discovery instance. Description Enter the required details in this field.
Note: Character limit: 2000 characters*: Mandatory fields -
In the Discover By section, from the Discovery From drop-down
list, select the source of the discovery as Managed
Firewalls.
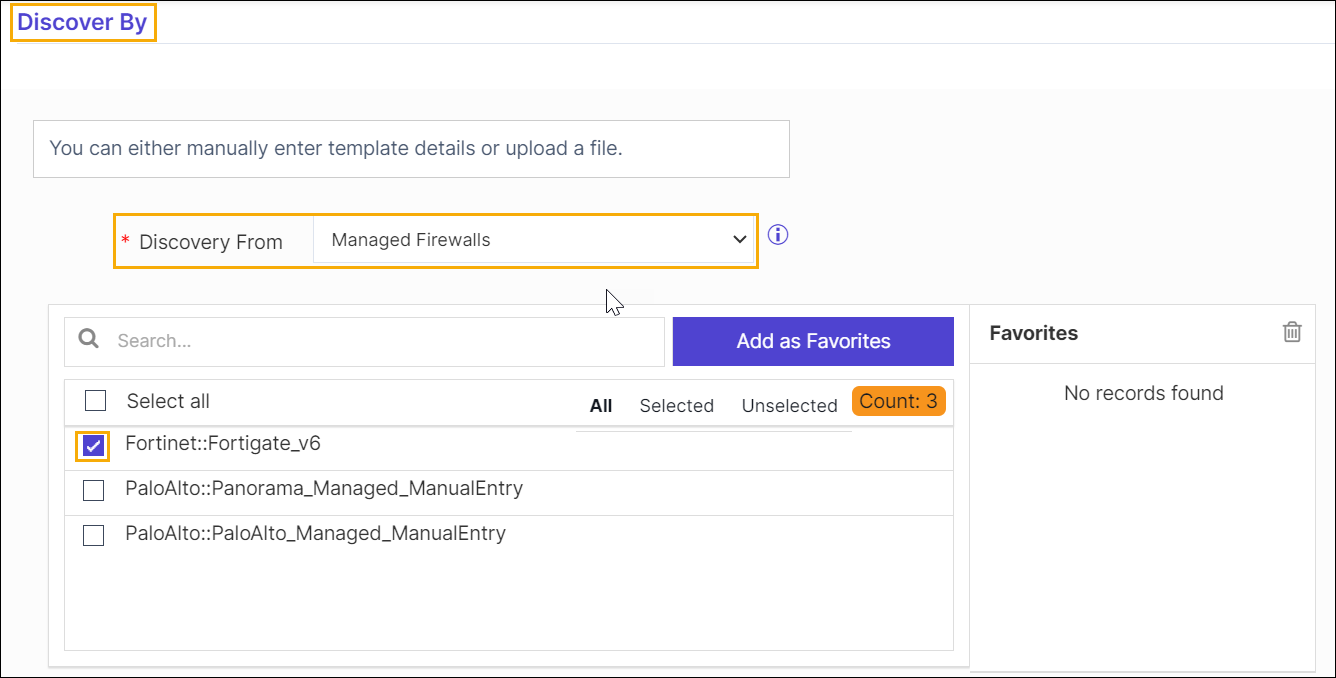 Based on your selection in this field, the rest of the fields will be displayed. For instructions on specifying the rest of the details.
 - Select the configured firewall device from the list of devices.
-
In the After Discover section, select the
Move Certificate to Inventory with Status as
Managed.
- Do not move: New discovered certificates and its objects will not be moved to inventory.
- Managed: New discovered certificates and its objects will be moved to inventory with the status Managed.
- Monitored: New discovered certificates and its objects will be moved to inventory with the status Monitor.
Note: If the discovered certificate already exists in the inventory, its object will be moved with the same status. - After discovery is completed and certificates are moved to inventory, navigate to Server Inventory.
Server Inventory
-
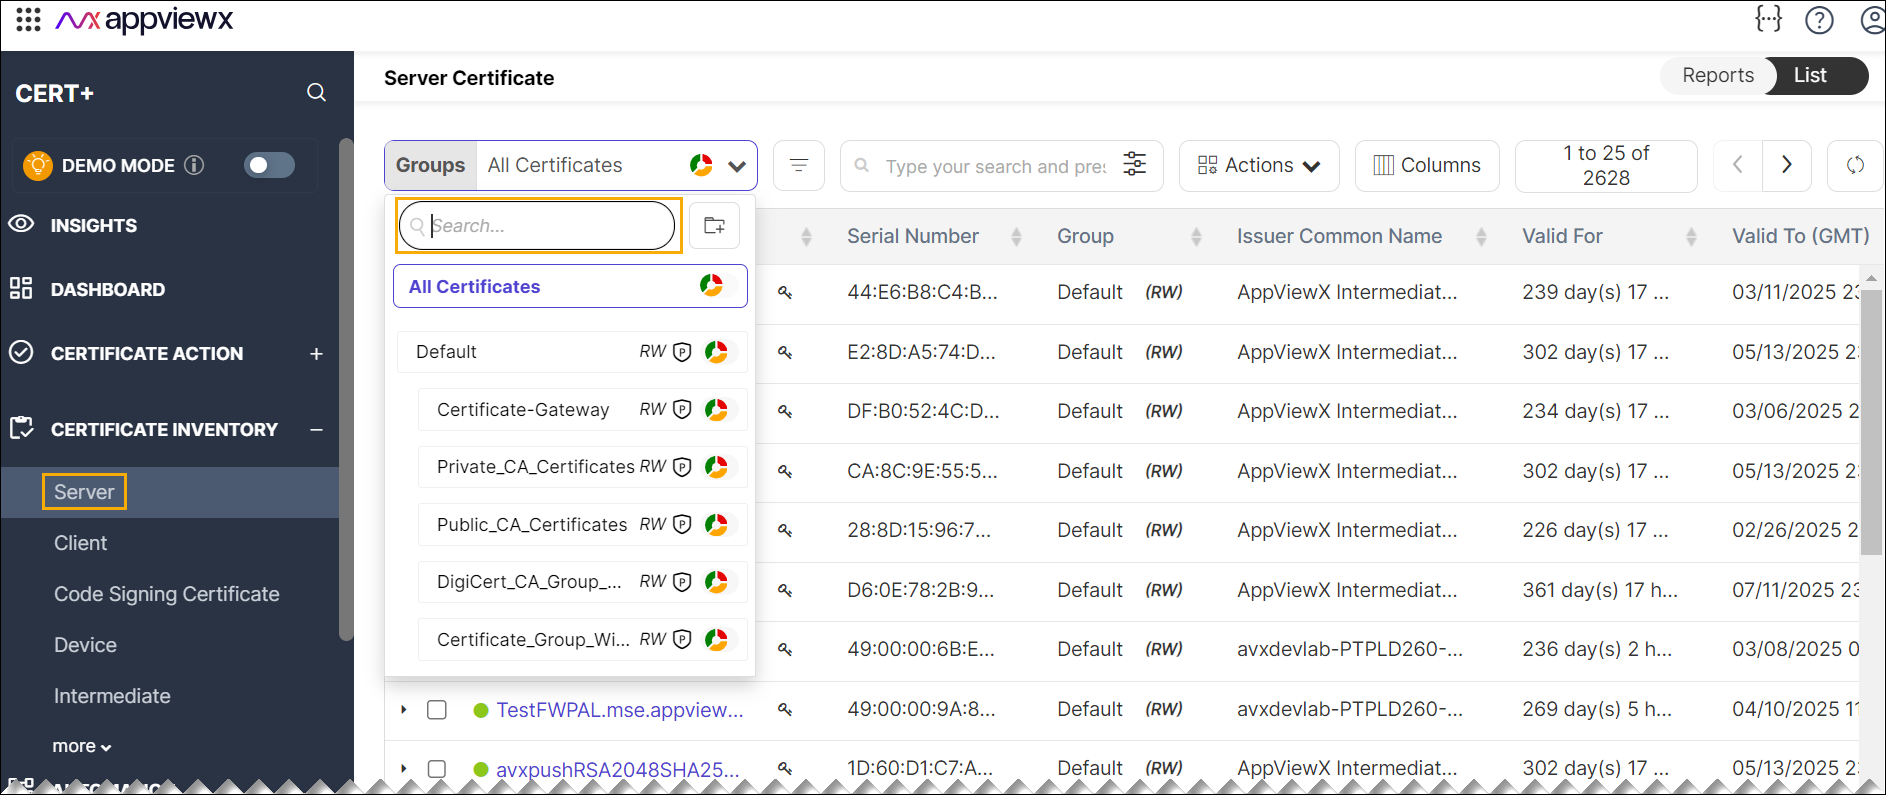
Go to (Menu) > CERT+ > CERTIFICATE
INVENTORY > Server.
The Server Certificate page is displayed.
-
Search with the configured firewall device name in the search field. For
example, search with PaloAlto_Firewall_Device
name.
-
Click the certificate that needs to be automatically renewed/regenerated
and pushed to the firewall devices.
You will be redirected to the Certificate Holistic View.
-
Click the (
 ) three dots icon available in the CA connector,
and then select Edit option
) three dots icon available in the CA connector,
and then select Edit option
- In the Edit Application Connector > Push Details section, click the Push Automatically check box, and set the renewal period.
- Click Save.
Certificate Group
-
Go to (Menu) >
CERT+ > GROUPS &
POLICIES > Groups.
The Group inventory is displayed. CERT+ is packaged with default certificate groups Default and Certificate-Gateway.
- Search with the configured firewall device group name in the search field. For example, search with PaloAlto_Firewall_Device name.
- Click the group to be modified.
- Go to Group : Modify : Certificate-Gateway > Other details section, enable the toggle button to On, by enabling the check box, the renewed/ reissued certificates in this group are automatically associated with their device.
Auto Renew Job
- A scheduled job runs every six hours, renewing and pushing certificates as configured.
- The system will manage the transition from old to new certificates automatically.
By following these steps, you can automate certificate management for firewall devices in the AppViewX platform efficiently.